Instructions
|
 |
 |
 |
| These are pics of what your new Shrockworks Rock Sliders and all the hardware you will get with them looks like right out of the box. Please make sure that you have everything listed out in the parts list before you begin this installation. |
 |
1. If your Jeep JK Wrangler Unlimited came equipped with factory side steps, running boards or rocker guards, you will need to remove these prior to the installation of your new Shrockworks Rock Sliders. |
 |
 |
 |
| 2. To remove either the Jeep JK Wrangler Unlimited Rubicon rocker guards or Sahara running boards, use a 10mm wrench to remove the 3 pairs of nuts securing them to the body pinch seam. |
3. Using a 13mm socket, remove the 3 bolts securing the Rubicon factory rocker guards or Sahara running boards to the bottom of your Jeep JK Wrangler Unlimited’s body. |
4. With the 6 nuts and 3 bolts removed, the factory rocker guards or running boards on your Jeep JK Wrangler Unlimited Rubicon or Sahara should pull off the body pinch seam with ease. Set them aside. |
 |
5. Using an 18mm socket, remove the 2 bolts securing your gas tank skid plate to the passenger side frame rails of your Jeep JK Wrangler Unlimited. |
 |
6. Look on the bottom of your Jeep JK Wrangler Unlimited’s passenger side frame rail close to the front lower control arm mount and locate the hole with a threaded nut welded on the inside. You will use this point to secure the forwardmost mounting point of your Shrockworks Rock Sliders. |
 |
7. Locate the passenger side Shrockworks Rock Slider (shortest leg goes up front) and then, with the help of a friend, hold it up to your Jeep JK Wrangler Unlimited’s frame rail and secure the bottom of the mounting brackets in place using the 2 factory gas tank skid plate bolts. Make sure that the gas tank skid plate is sandwiched in between the two. |
 |
8. Secure the Shrockworks Rocker Guard forward most frame mount to the bottom of the frame rail on your Jeep JK Wrangler Unlimited by threading in one of the 1/2″x1-1/4″ bolts and washers provided. |
 |
9. Using an 18mm socket, tighten the 2 gas tank skid plate bolts so that the Shrockworks Rock Rail is sitting firmly on the frame rail of your Jeep JK Wrangler Unlimited. Then use a 19mm socket to tighten down the forward most mounting bolt. |
| 10. Now, stand back and give your Shrockworks Rock Sliders a good look to make sure they are sitting parallel to the body of your Jeep JK Wrangler and make whatever adjustments you need at this time. If you don’t, it will be very difficult to fix or adjust any mistakes you make beyond this point. |
 |
11. Using the Shrockworks Rock Slider mounting brackets as a template, mark off the location of where you will need to drill the side mounting holes into the side of your Jeep JK Wrangler Unlimited’s frame rail. According to Shrockworks, you will need to use the upper holes. |
 |
12. Remove your Shrockworks Rock Slider from your Jeep JK Wrangler Unlimited’s frame rail. Then, using a center punch and hammer, mark off the center point of where you will need to drill. This step will help you to drill an accurate hole by preventing your drill bit from walking. |
 |
 |
 |
| 13. Because of the tight space between the frame rail and body pinch seam on your Jeep JK Wrangler Unlimited and because they’re just so easy to use, I would recommend that you drill your holes out with a Unibit. And, to help you know how far to drill without stopping every 10 seconds, wrap a piece of tape around the 1/2″ mark as shown in this pic. |
14. Drill the forward most and rear most mounting holes into the side your Jeep JK Wrangler Unlimited’s frame rail. If you are not using a Unibit, be sure to use a 1/8″ drill bit to create pilot holes prior to drilling them out to the required 1/2″ to prevent any walking of the bit. Again, due to the tight space you will have to work with, I would recommend the use of a rightangled drill if you have access to one. |
15. Drill the center mounting hole into the side of your Jeep JK Wrangler Unlimited’s frame rail using the 21/64″ drill bit provided with the Shrockworks Rock Sliders hardware kit. |
 |
16. To help prevent rusting, apply some touch up paint to the edges of the holes you just drilled out and then re-install your Shrockworks Rock Slider to the bottom of your Jeep JK Wrangler Unlimited’s frame rail. |
 |
17. Secure the Shrockworks forward most and rear most side mounts to your Jeep JK Wrangler Unlimited’s frame rail using the 1/2″x1-1/4″ Bolts, Washers and Stick Nuts provided with hardware kit. To do this, you will need to bend and shape the stick nuts so that you can fish it up into the frame rail and hold it in place while you thread on the bolt as shown in this pic. |
 |
18. Holding the stick nut tightly, use a 3/4″ socket to tighten the forward most and rear most Shrockworks Rock Slider side mounting bolts in place. Bend and tuck the remaining sticks up into your Jeep JK Wrangler Unlimited’s frame rail. |
 |
19. Using a 9/16″ socket, secure the Shrockworks Rock Slider center side mounting bracket to your Jeep JK Wrangler Unlimited’s frame rail with one of the 3/8″ self-tapping bolts provided with the hardware kit. Remember to take your time with this and back out frequently to clean out the cut material and insure you are creating clean threads. |
| 20. Double check all your bolts to make sure they are on tightly and then move over to the driver side of your Jeep JK Wrangler Unlimited. |
 |
 |
 |
| 21. Using an 18mm socket, remove the bolt securing the transfer case skid plate support bar to the driver side frame rail of your Jeep JK Wrangler Unlimited. |
22. Using an 18mm socket, loosen but do not remove the 2 bolts securing the transfer case skid plate to your Jeep JK Wrangler Unlimited’s cross member. |
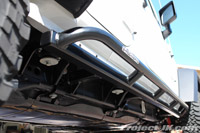
23. With all 3 bolts loosened, you should now have about an inch gap between your Jeep JK Wrangler Unlimited’s transfer case skid plate support bar and frame rail as shown in this pic. |
 |
24. With the help of a friend, hold up your driver side Shrockworks Rock Slider up to your Jeep JK Wrangler Unlimited’s frame rail making sure to slip the middle mounting bracket in between the frame rail itself and the transfer case skid plate support bar. Secure it in place using the factory bolt and tighten it down with an 18mm socket. |
 |
25. Secure the Shrockworks Rocker Guard forward most frame mount to the bottom of the frame rail on your Jeep JK Wrangler Unlimited by threading in one of the 1/2″x1-1/4″ bolts and washers provided. Tighten this bolt down using a 19mm socket. |
| 26. Once again, stand back and give your Shrockworks Rock Sliders a good look to make sure they are sitting parallel to the body of your Jeep JK Wrangler and make whatever adjustments you need at this time. If you don’t, it will be very difficult to fix or adjust any mistakes you make beyond this point. |
 |
27. Unlike the passenger side of your Jeep JK Wrangler Unlimited, there is no hole on the bottom of the frame rail where your Shrockworks Rock Slider rear mounting bracket needs to bolt up to and so one will need to be created. Using the Shrockworks Rock Slider as a template, mark the location of where you will need to drill this hole as well as all the side mounting holes as you did on the passenger side earlier. |
 |
28. Remove the Shrockworks Rock Slider from your Jeep JK Wrangler Unlimited’s frame rail and then using a center punch and hammer, mark off all the center points of where you will need to drill. |
 |
29. Using a Unibit or 1/8″ drill bit, create a pilot hole where the Shrockworks Rock Slider rear mounting bracket bottom hole needs to be made. |
 |
30. The steel in this part of your Jeep JK Wrangler Unlimited’s frame rail is quite thick and you will need to use a 1/2″ drill bit to make it all the way through. |
 |
31. Repeat steps 13-19 on the driver side of your Jeep JK Wrangler Unlimited to finish up your installation of your Shrockworks Rock Sliders. I should warn you that getting the rear most bolts installed can be a challenge but it is doable. Just be prepared for this to take some time and effort. |
That’s it, you’re done. You now have an awesome set of heavy duty Shrockworks Rock Sliders installed on your Jeep JK Wrangler Unlimited!If you plan on using the tube side bars as a step, I would recommend the installation of grip tape on top of it for better tractions. Without it, they can prove to be quite slippery when wet or muddy.
If you have any questions, please don’t hesitate to ask. |
Additional Photos
|
 |
 |
 |
| >> Click here to see more pics |

I just installed my sliders on last night and this walkthrough was extremely helpful. Much more detailed than the instructions included. My sliders actually had two steel plates that you didn’t reference and neither did the instructions. I stuck them behind the middle frame mount to make everything sit flush.
Thanks for the writeup and pics!
Hey Trent, I’m glad to hear my write-up was helpful to you. 🙂
Eddie
Eddie,
thanks for the write up..i just installed mine and followed your write up to a tee. was extremely helpful
thanks for your hard work on doing these write ups
Thanks Eddie, What a great write up on the installation. Sure made thing easier, the pics. were great. Keep up the good work!
Roy
Thank you for your write up on the Shrock rock rails. The instructions that came with it left a bit to be desired. Yours gave me the confidence to do it and everything went well. I was initially uptight about the stick nuts but even the LH rears were very doable. One of the front nuts is turning but should be alright, the others are tight. Had to use the spacer on the LH middle position. Glad they thought of including them. I’m not too sold on the selftaps but we shall see. My Stubby should be arriving this week and I will thank you in advance for the directions for the bumper. This is an incredible website.
Bruce
just installed shrockworks sliders amd am looking into skid plates, what skid plates work well with shrockworks rock sliders
I wonder if this description is still accurate…if any changes to their design has happened since?
@Guy,
I just installed these today on my ’13 Rubi JKU and yes, the instructions here are still pretty valid. The exact same parts as listed here were included in my kit. There are some slight changes, though. For example, the threaded hole mentioned on the passenger’s side was off — for me, all three bottom holes used existing skid-plate bots. Also, the stick nut for the newly drilled hole in the bottom of the frame on the driver’s side is a BEAST to get in. I ended up putting the stick nut in backwards, pulling the actual stick part through another hole that wouldn’t fit the nut end and then lining it up. A few of the stick nuts were really frustrating.
I’m not a fan of the pinch seam showing, but I’m just gonna mask it off at the bend and spray it with some bed liner. I have LOD bumpers, too, and the finish i bit more textured. These sliders are glossy powdercoat. I’m considering just using some AEV Bumper Pain (or bed liner) to make the sliders match a bit more… we’ll see.