Instructions
|
 |
This is a pic of all the parts you should get with the Currie Rock Jock JK Suspension System. Take some time to make sure you have all the parts shown as well as all the tools listed on the left prior to starting this project. |
Rear End Installation
|
 |
 |
 |
| 1. Park your Jeep JK Wrangler on a level surface, chock your front tires and then lift up the rear end of your Jeep JK Wrangler from the differential using a tall floor jack. |
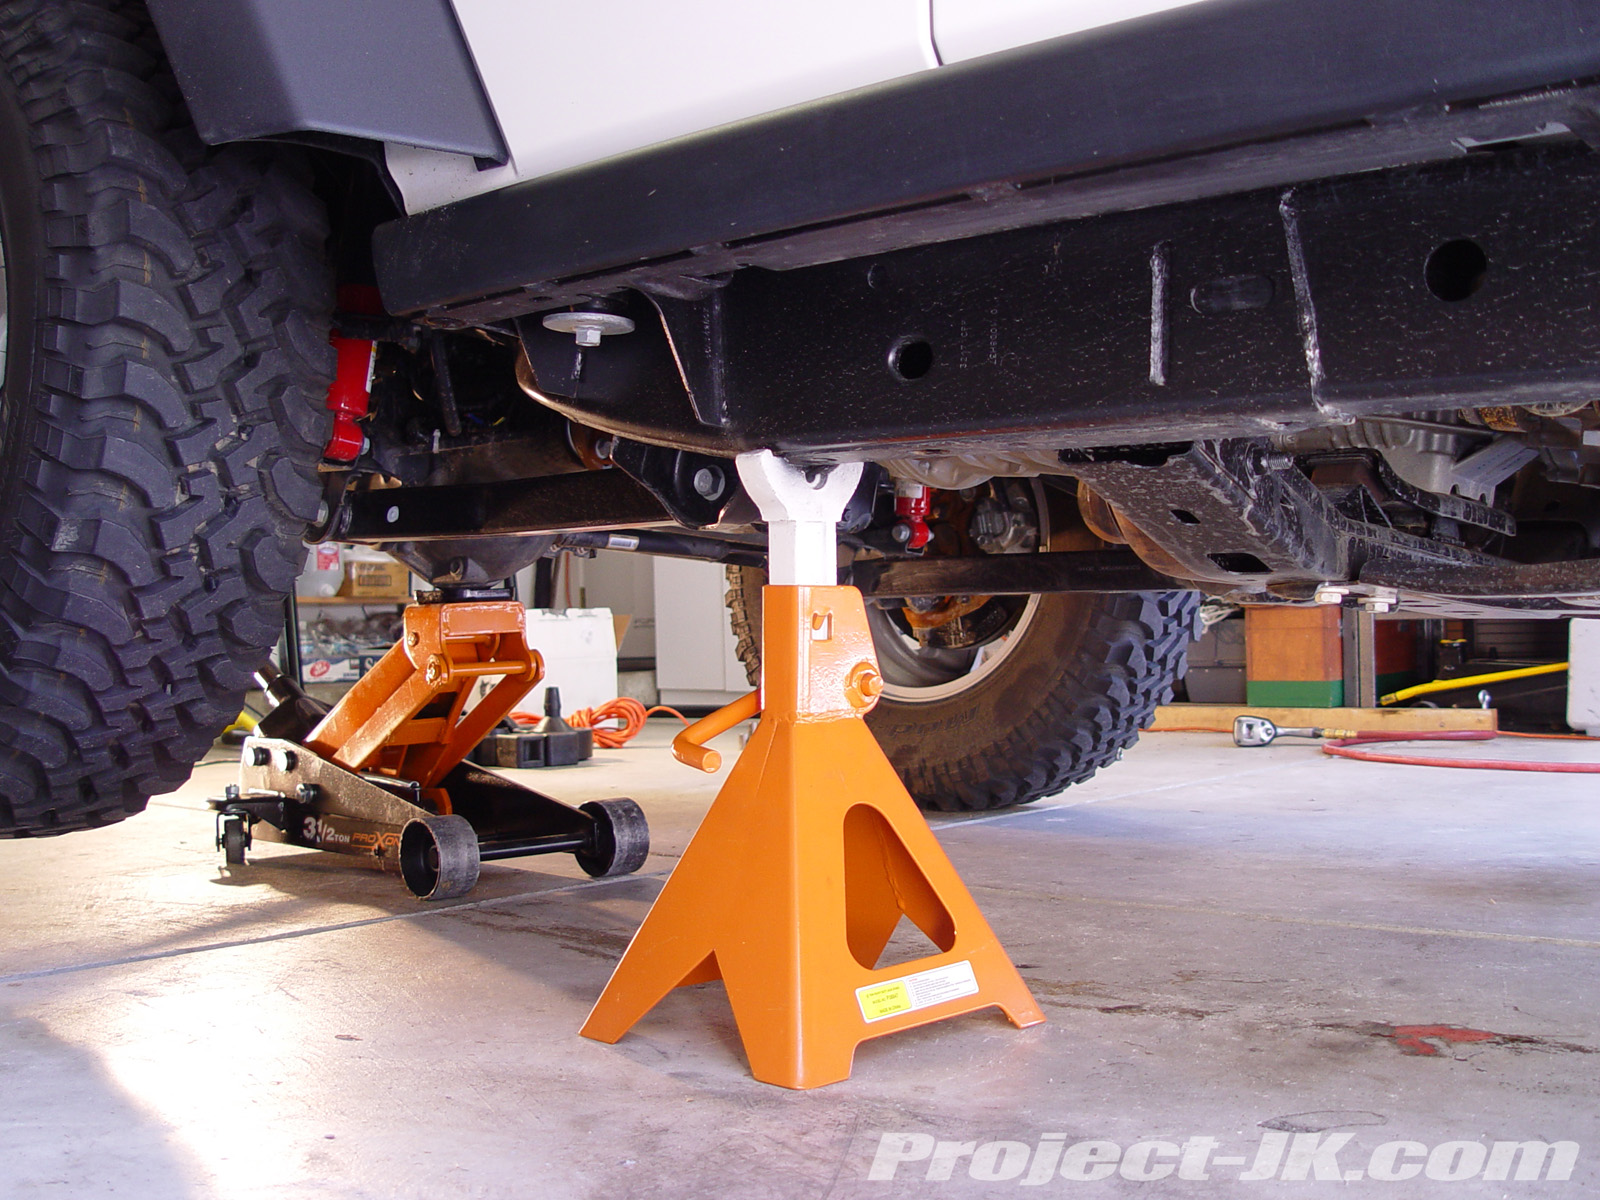
2. Place a jack stand under each frame rail just in front of the lower control arm mounts and then carefully lower your Jeep back down until it is being help up by them. Double check to make sure that your Jeep is sitting safely and securely on the jack stands |
3. Using a 19mm lug wrench or socket, remove your Jeep JK Wrangler’s rear wheels and then place them under the frame rails for added protection. Leave the floor jack under the axle to help support it. |
 |
 |
 |
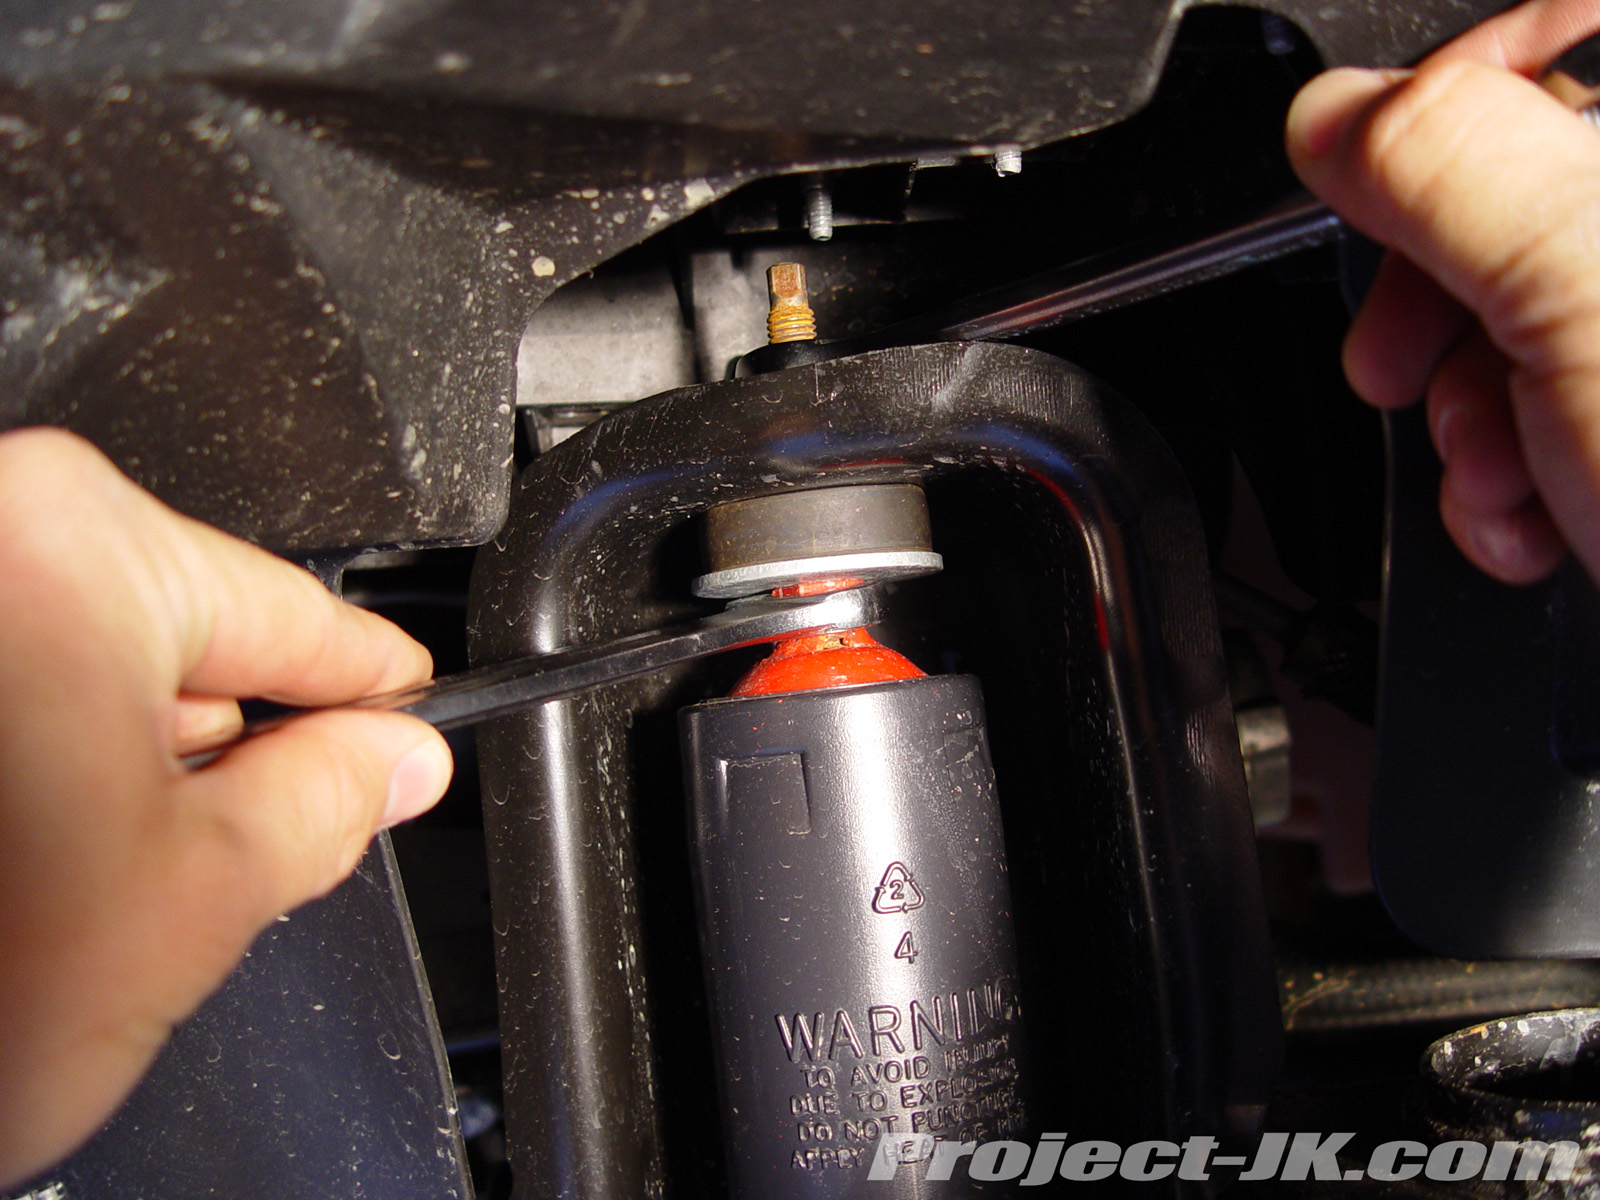
| 4. Using a 16mm socket and a 6″-12″ ratchet drive extension, remove your Jeep JK Wrangler’s 2 upper rear shock mount bolts. |
5. Using an 18mm socket and wrench, remove the bolt and nut securing your Jeep JK Wrangler’s rear shocks to the lower axle mounts. Remove and set aside your shocks for now. |
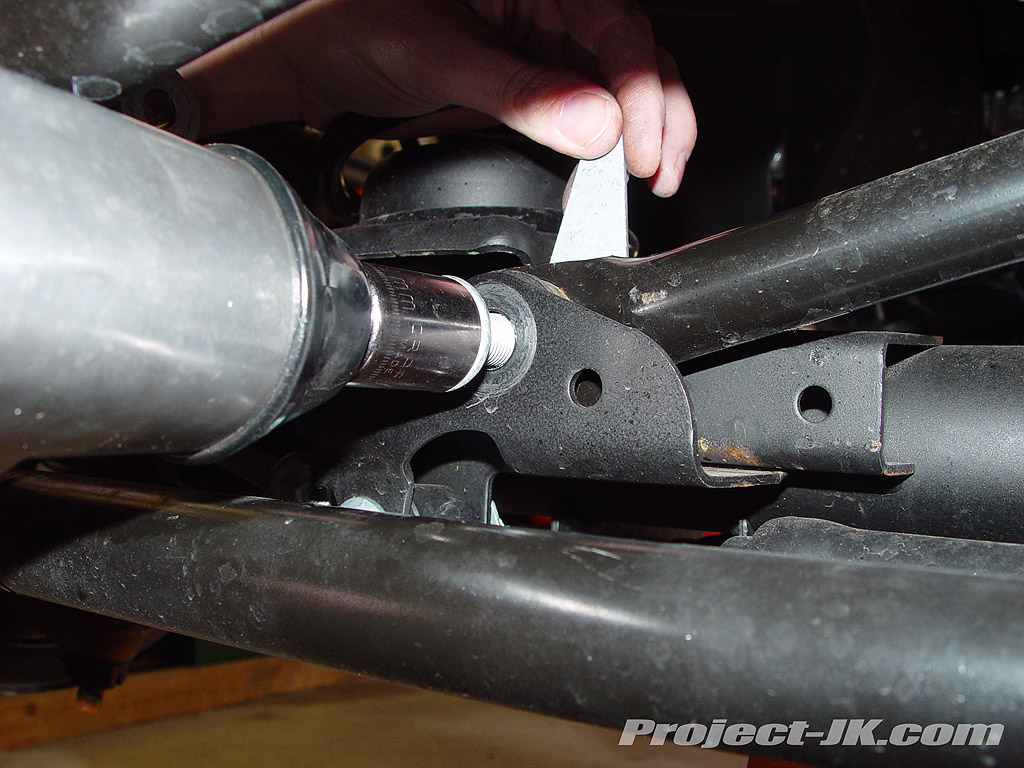
6. Using an 18mm socket and wrench, remove the bolt and nut securing your Jeep JK Wrangler’s rear sway bar link to the lower axle mount. Slip a 19mm wrench in between the sway bar link and sway bar itself to secure the ball joint stud. Then, remove the nut securing it in place with an 18mm wrench. Completely remove the links from the sway bar itself. |
 |
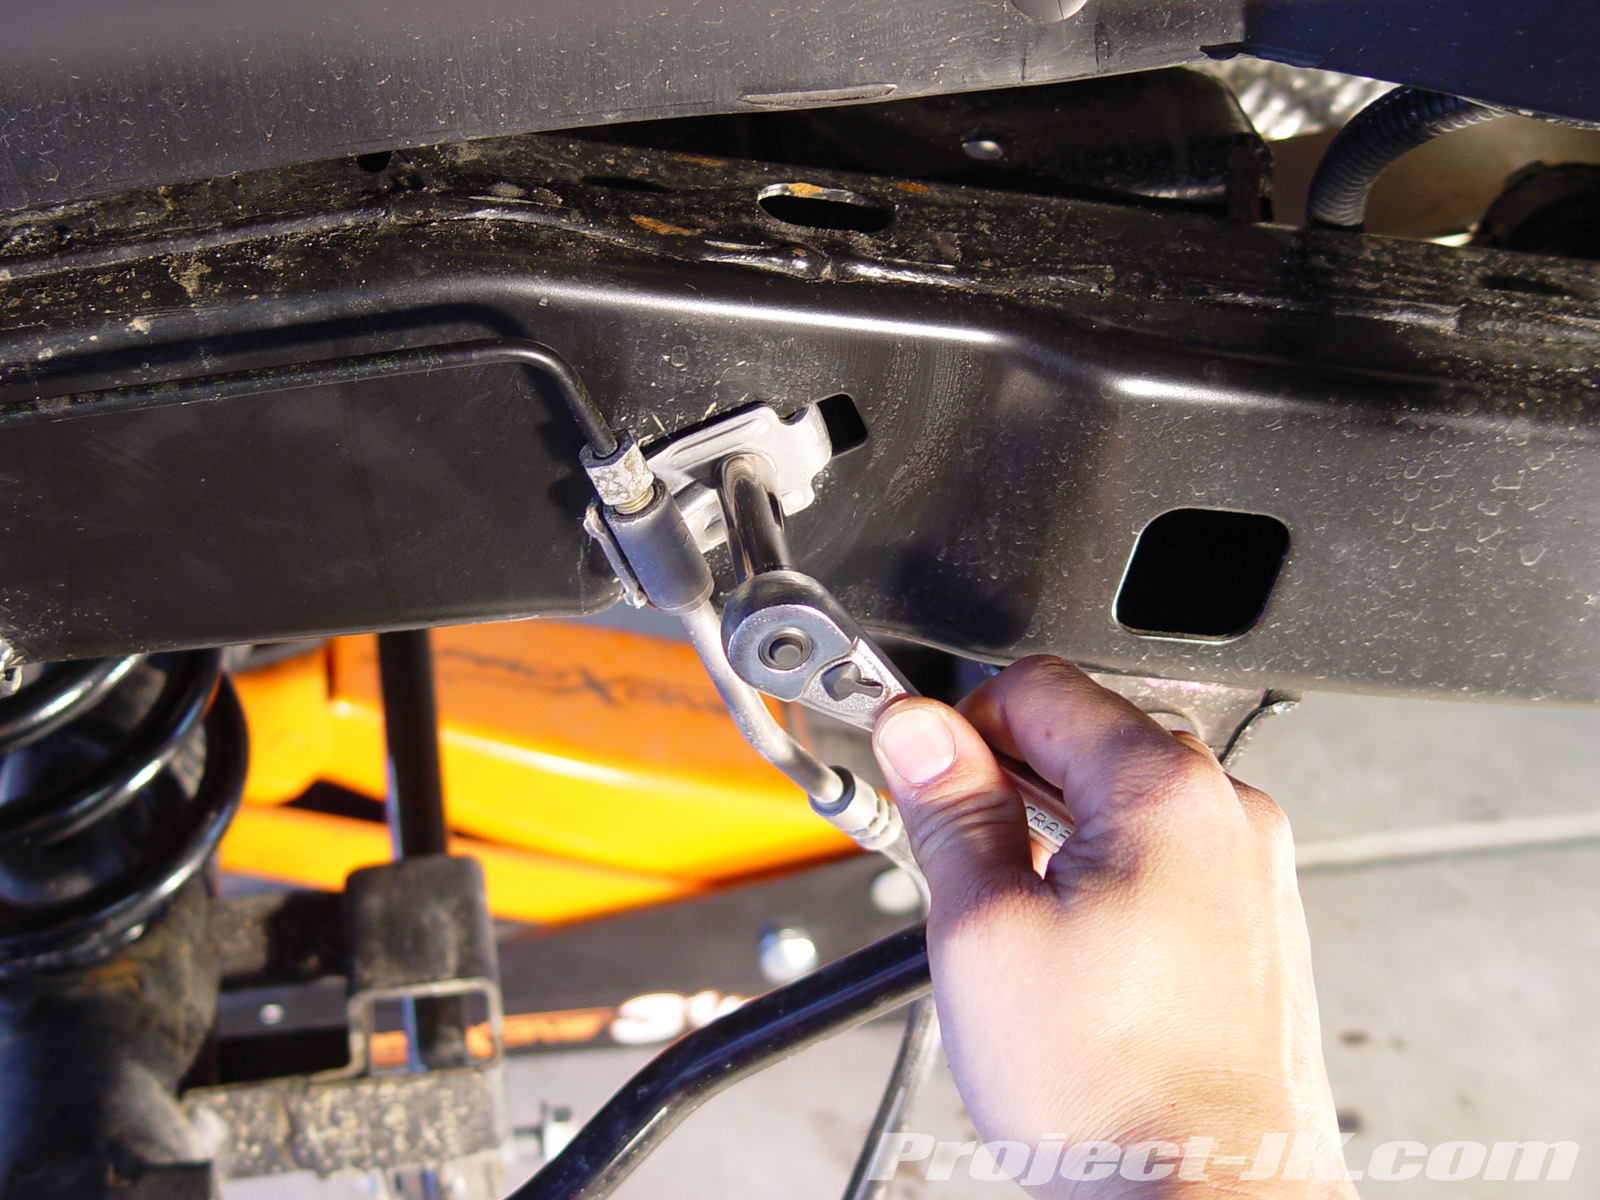
7. Remove the rear track bar bolt and nut from your Jeep JK Wrangler’s lower axle mount using a 21mm socket. This can be a tough bolt to remove and a breaker bar will help to make this job easier. |
 |
 |
 |
| 8. Using a 10mm deep well socket and extension, remove the 2 nuts securing your Jeep JK Wrangler’s emergency brake cables to the bottom of the tub. This is necessary in order for you to get your rear axle to droop enough to install your new coils. |
9. Using a 10mm socket, unbolt the rear brake line brackets which are fastened to the outside frame rails of your Jeep JK Wrangler. Leave them dangling at this time. |
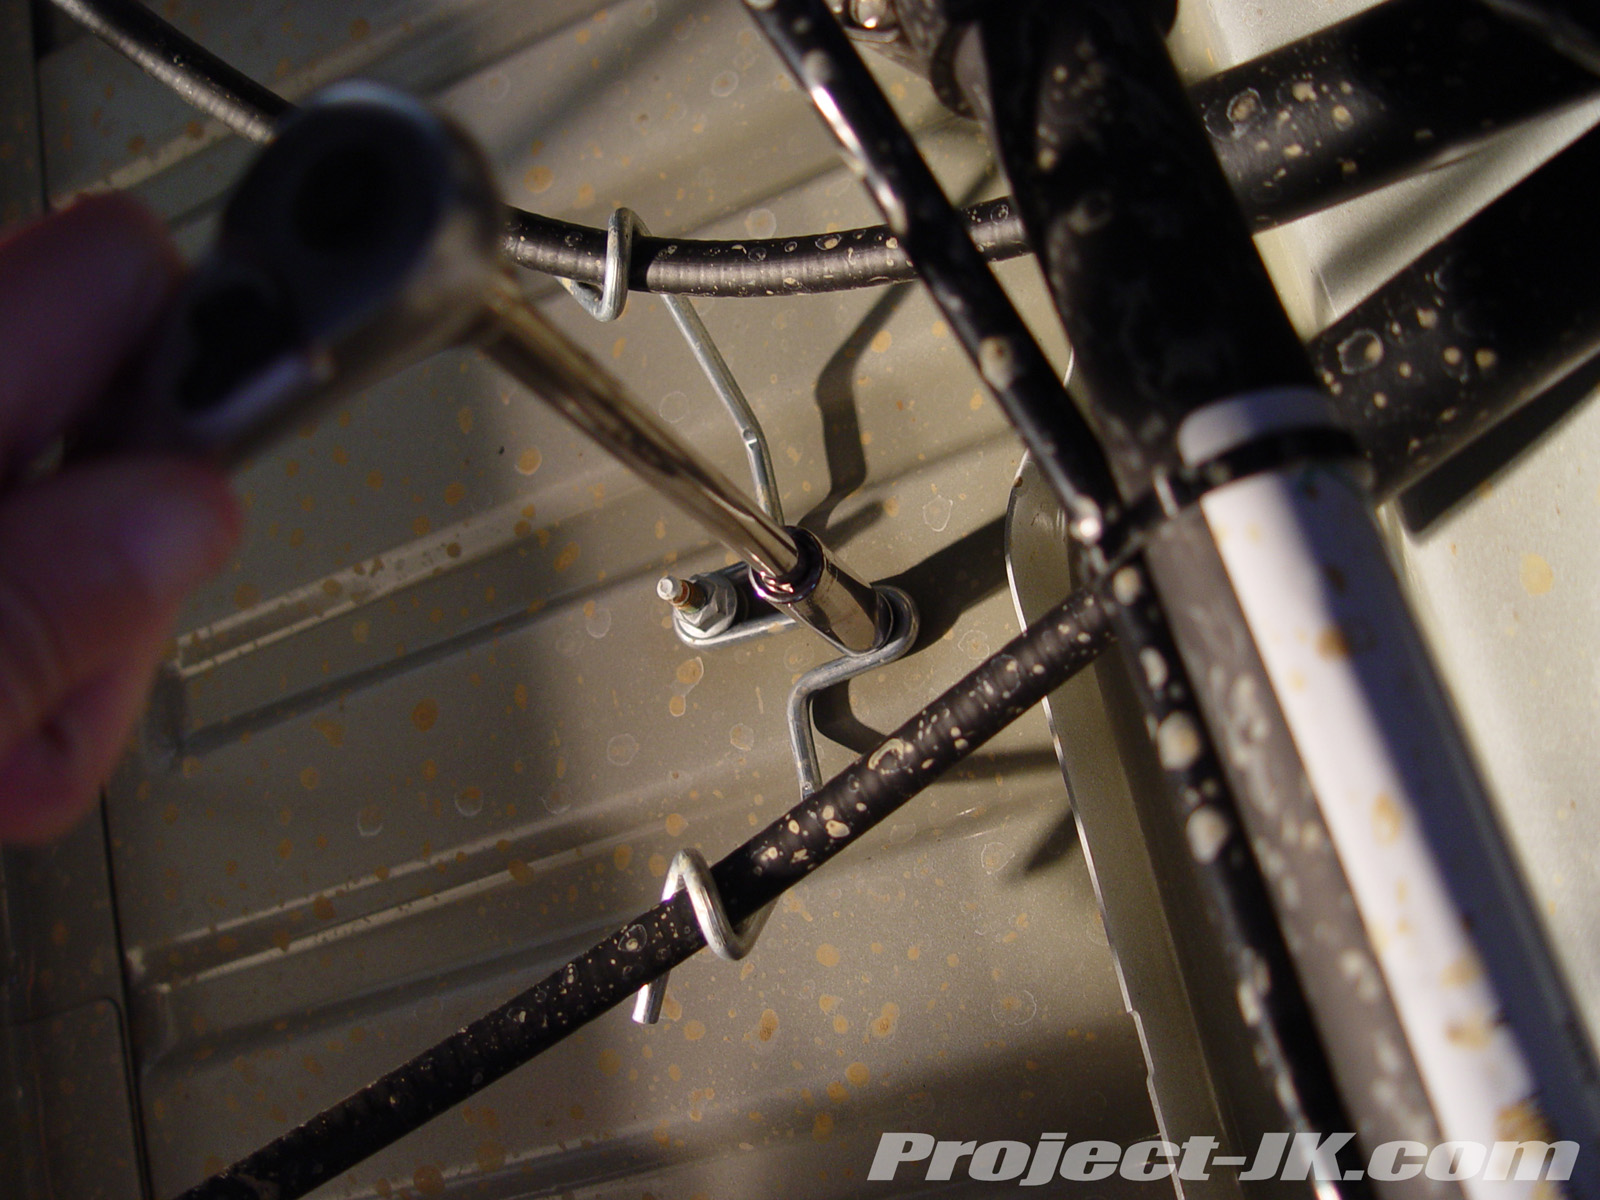
10. Using a pair of pliers, separate the clip securing the ABS sensor wires to the rear upper control arm axle mounts as shown in this photo. |
 |
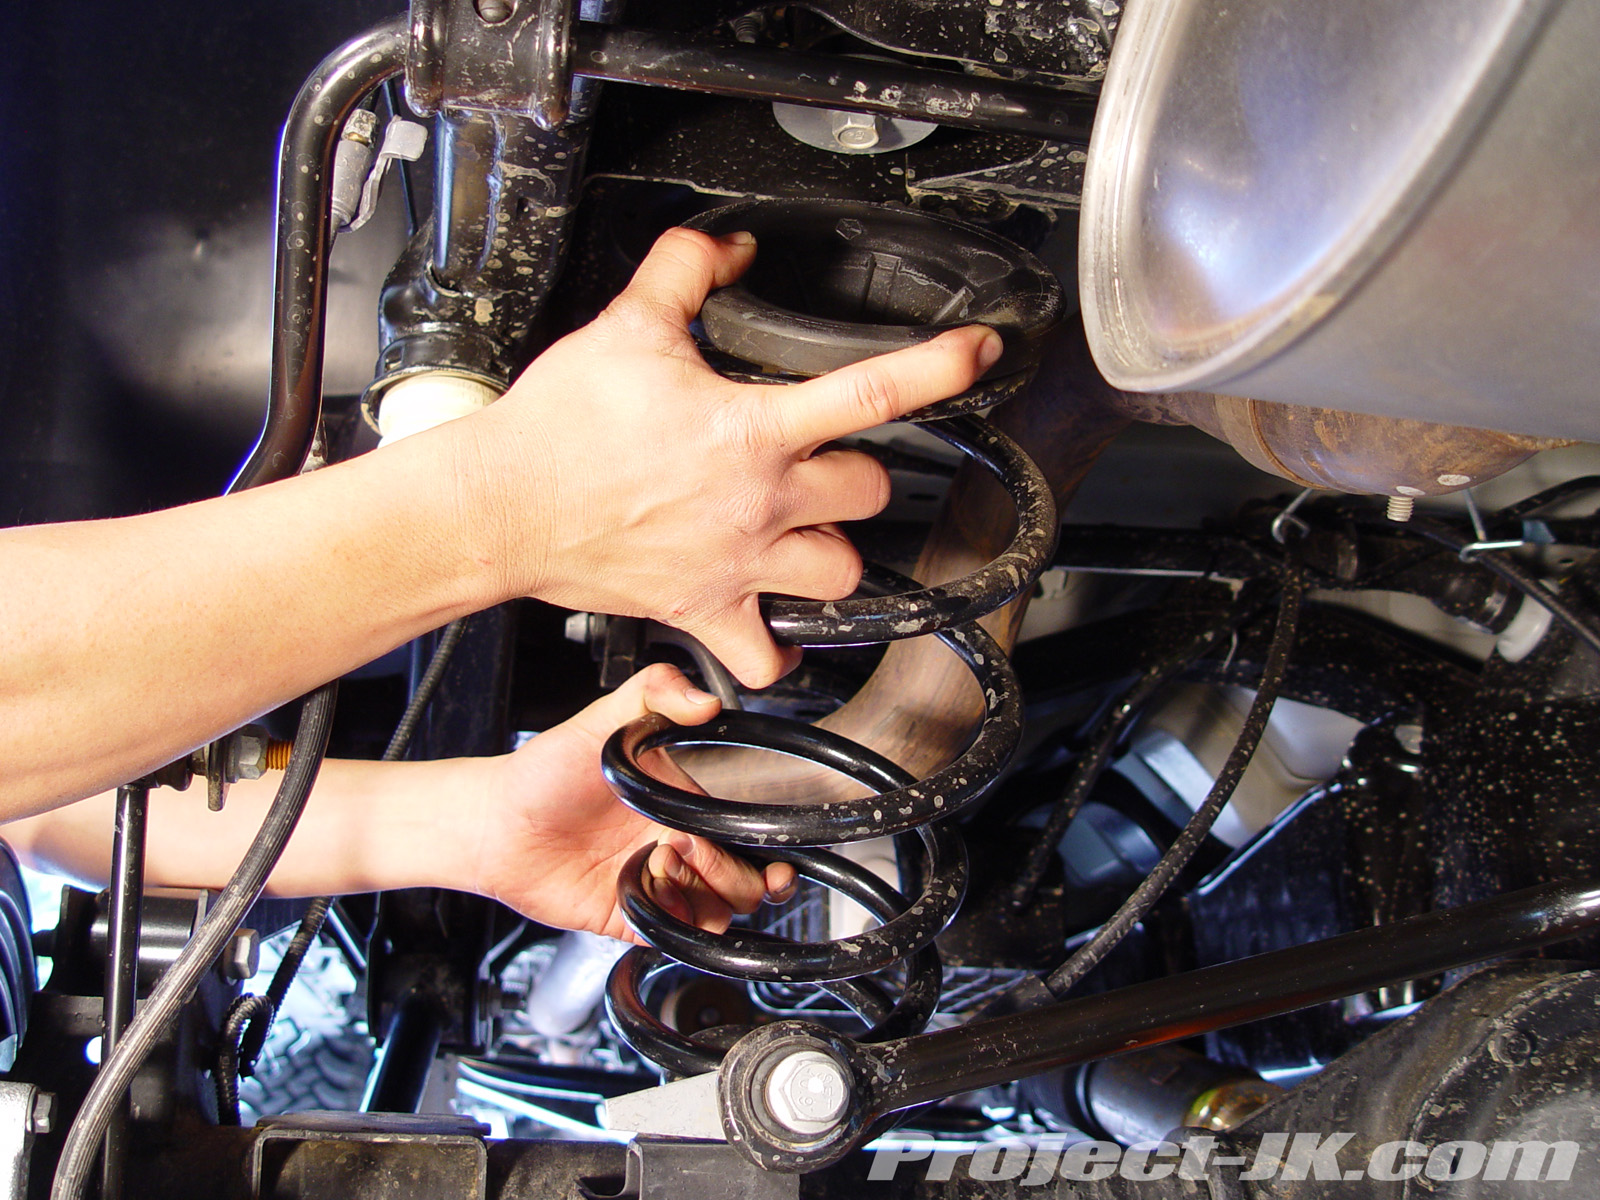
11. Slowly lower your Jeep JK Wrangler’s rear axle until your factory coils just about fall out and can be removed with ease. Set aside the upper rubber isolators as they will be reused. |
 |
12. Your new Currie Rock Jock rear adjustable lower control arms should come pre-set to the required 19-5/8″ center to center length as specified by Currie. However, please verify this to be the case on both arms using a tape measure as shown in this pic. If it is off, loosen the jam nut and rotate the gold Johnny Joint end in or out to lengthen or shorten the control arm as needed. Once it is set, make sure to secure it in place with the jam nut. |
 |
13. Making sure to replace just one arm at a time, start on the driver side of your Jeep JK Wrangler, remove the bolt securing the factory rear lower control arm to the frame rail mount using a 21mm socket. This bolt will be tough to remove and the use of a breaker bar may be needed. Set aside your hardware for now as they will be reused. |
 |
14. Remove the bolt securing your Jeep JK Wrangler factory rear lower control arm to the axle mount using a 21mm socket and wrench. As before, this bolt will be tough to remove and a breaker bar may be needed. Again, be sure to save the factory hardware as they will be reused. |
 |
15. With the gold adjustable Johnny Joint end oriented towards the frame mount and with the zerk nipple pointing up, install your new Currie Rock Jock adjustable rear lower control arm onto the frame mount using the factory hardware. Loosely tighten the bolts on for now. |
 |
16. Install your new Currie Rock Jock adjustable rear lower control arm onto the axle mount using the factory hardware. Loosely tighten the bolts for now. |
| 17. Repeat steps #13-16 on the passenger side and then tighten up all the lower control arm bolts on both sides of your Jeep JK Wrangler to 125 ft. lbs. of torque. |
 |
18. As was the case with your new Currie Rock Jock rear adjustable lower control arms, the upper arms should come pre-set to the required 17-11/16″ center to center length as specified by Currie. However, please verify this to be the case on both arms using a tape measure as shown in this pic. If it is off, loosen the jam nut and rotate the gold Johnny Joint end in or out to lengthen or shorten the control arm as needed. Once it is set, make sure to secure it in place with the jam nut. |
 |
19. Back on the driver side of your Jeep JK Wrangler, remove the bolt securing your factory rear upper control arm to the frame rail mount using a 21mm socket. As before, this bolt may be tough to remove and a breaker bar may be needed to help out. Set aside both the bolt and flagged nut as they will be reused. |
 |
20. Remove the bolt securing your factory rear upper control arm to your Jeep JK Wrangler’s axle mount using a 21mm socket. Again, this bolt may require the use of a breaker bar in order to free it up. Be sure to save the factory hardware as they will be reused. |
 |
21. With the gold adjustable Johnny Joint end oriented towards the axle mount, the bend in the arm going inward and with the zerk nipple on the frame side pointing down, install your new Currie Rock Jock adjustable rear upper control arm onto the frame mount using the factory bolt and flagged nut. Threading the bolt into the flagged nut can be tricky but just take your time and be persistent and you’ll be able to get it on. Loosely tighten the bolt on for now. |
 |
22. Install your new Currie Rock Jock adjustable rear upper control arm onto the axle mount using the factory hardware. Loosely tighten the bolts for now. |
| 23. Repeat steps #19-22 on the passenger side of your Jeep JK Wrangler and then tighten up all the upper control arm bolts on both sides of your Jeep JK Wrangler to 125 ft. lbs. of torque. |
 |
 |
 |
| 24. Place a pry bar between the Currie Rock Jock Johnny Joint and the lower control arm frame mount on your Jeep JK Wrangler (to prevent the joint from rotating over) and then using a large crescent wrench, secure the jam nut up against the control arm itself as shown in this pic. |
25. Once again, use a pry bar to help keep the Currie Rock Jock Johnny Joint from rotating and then secure the upper control arm jam nun using a large crescent wrench as shown in this pic. |
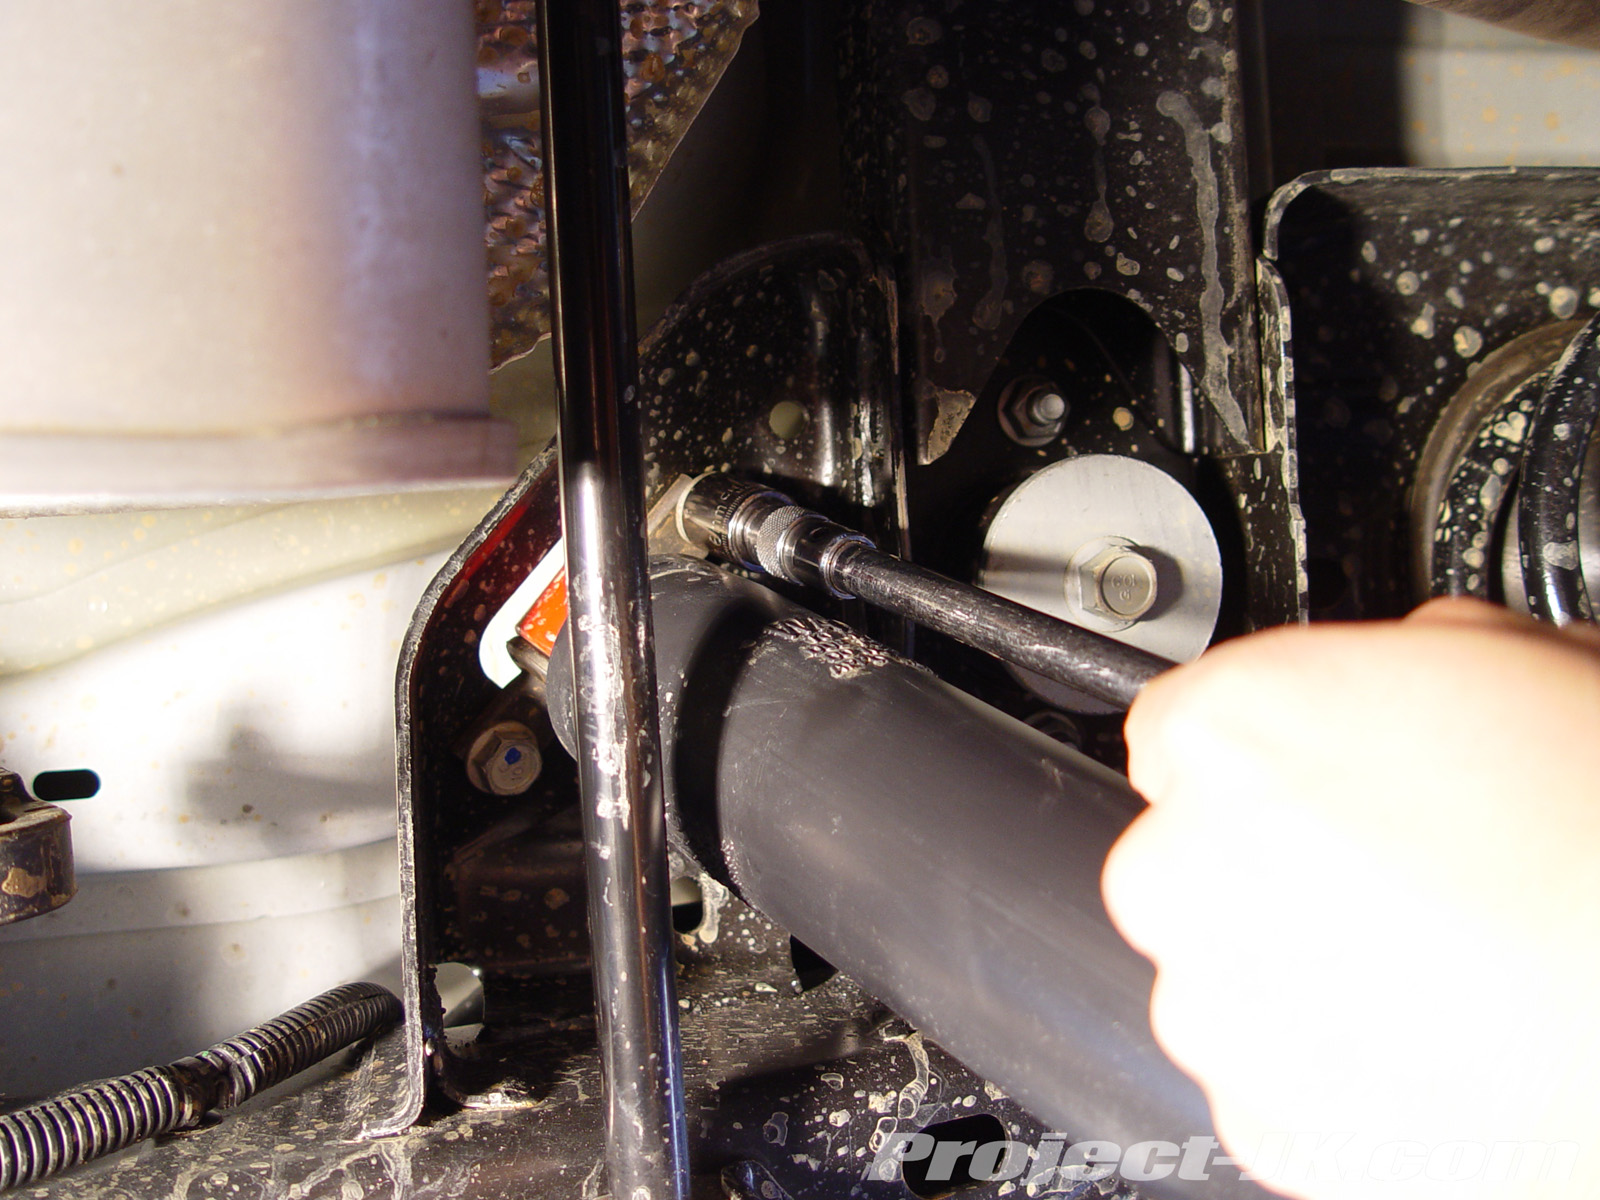
26. Use a grease gun and lube all 8 zerk nipples (1 on each Johnny Joint) as needed. Some of the zerk grease points may be difficult to reach and I would recommend replacing the rigid barrel of your gun with a hose attachment as as shown in this pic it will help you out a lot. |
 |
27. Place your new Currie Rock Jock rear bump stop blocks on top of your Jeep JK Wrangler’s rear axle bump pads and secure them in place using the nuts bolts and washers provided with the kit. You will need a 9/16″ wrench and socket for this job. |
 |
28. Place your factory rubber isolators on top of your new Currie Rock Jock rear coils and Install them on the rear of your Jeep JK Wrangler making sure that the isolators and coils are properly seated in their perches. |
 |
 |
 |
| 29. To begin the installation of the Currie Rock Jock spring retainers, take the bungs and slip them over the top of the upper perches and set them in the center holes. |
30. Reach in between the coils and insert the Currie Rock Jock spring retainer spacers through the bottom of the upper spring perch rubber isolator. |
31. Using the 1/2″-20×2-1/2″ bolts and 1/2″ washers provided, slip the Currie Rock Jock upper spring retainer clamps in between the coils and insert the bolt up through the center retainer spacers and bungs. Make sure that the clamps are positioned at a 90° angle to the end of the springs. |
 |
32. Secure the Currie Rock Jock upper spring retainer clamps in place by slipping a 1/2″-20 nyloc nut and two 1/2″ washers over each spring perch and fasten them to the previously installed bolt coming up through the center. You will need a 3/4″ wrench and socket for this job. |
 |
33. Slip the large 3-1/2″ ODx1/2″ID lower spring retainer washers through the bottom of your coils and then slip the nutplates up through the bottom of your lower axle spring perches. Apply some red loc-tite to the 1/2″-13×1″ thread forming bolts and use them to secure the nut plate and spring retainer washers in place. A 3/4″ socket will be needed for this job. NOTE: You may need to bend the nutplates a bit in order for them to be installed properly. Also, make sure that you DO NOT over-tighten the bolt. |
 |
 |
 |
| 34. Open up your hood so that you can keep an eye on the master cylinder and then place an oil catch pan underneath your Jeep JK Wrangler’s driver side rear brake caliper. Then, using a 15mm socket, remove the banjo bolt securing your brake line to it. |
35. Remove the banjo bolt from the brake hose, remove the copper washers and then set it aside for now as you will need to reuse this bolt. Try to hang or position the loose brake line end up to help minimize the amount of brake fluid that will leak out. |
36. Using a 10mm socket, loosely reattach your Jeep JK Wrangler brake line back onto the frame rails as it will help you separate the hard line from it. |
 |
 |
 |
| 37. Using an 11mm wrench, separate your Jeep JK Wrangler’s hard line from the bracket/hose. Then, using a 10mm socket, remove the bolt securing the bracket/hose to the frame rail. Set aside the bolt for later use but the hose can be discarded. |
38. Slip one of the new copper crush washers that should come with your new stainless steel brake lines on to the factory banjo bolt you removed earlier. |
39. Insert the factory banjo bolt with copper crush washer on through the new stainless steel brake line (be mindful that the elbow of the hard line needs to extend towards the back) and then slip on another copper crush washer as shown in this pic. |
 |
40. Using a 15mm socket, secure your new stainless steel break line to the break caliper on your Jeep JK Wrangler making sure that the hard line elbow extends out and back (as opposed to up, then out) as shown in this pic. Be VERY CAREFUL to only tighten the banjo bolt to 23 ft. lbs. of torque. This is a very delicate bolt and can break easily if too much force is applied. |
 |
 |
 |
| 41. Use a 10mm socket to secure your new stainless steel brake line mounting brackets to your Jeep JK Wrangler’s frame rails using the factory bolts. |
42. Slip your new stainless steel brake line up through the new mounting bracket and then fasten your Jeep JK Wrangler’s factory hard line to it using a 12mm and 17mm wrench. |
43. Secure your new stainless steel brake line to the mounting bracket using the retaining clip provided with the kit. |
44. Check the fluid level in your master cylinder, fill as needed and then repeat steps #34-43 on the passenger side of your Jeep JK Wrangler.
|
 |
 |
 |
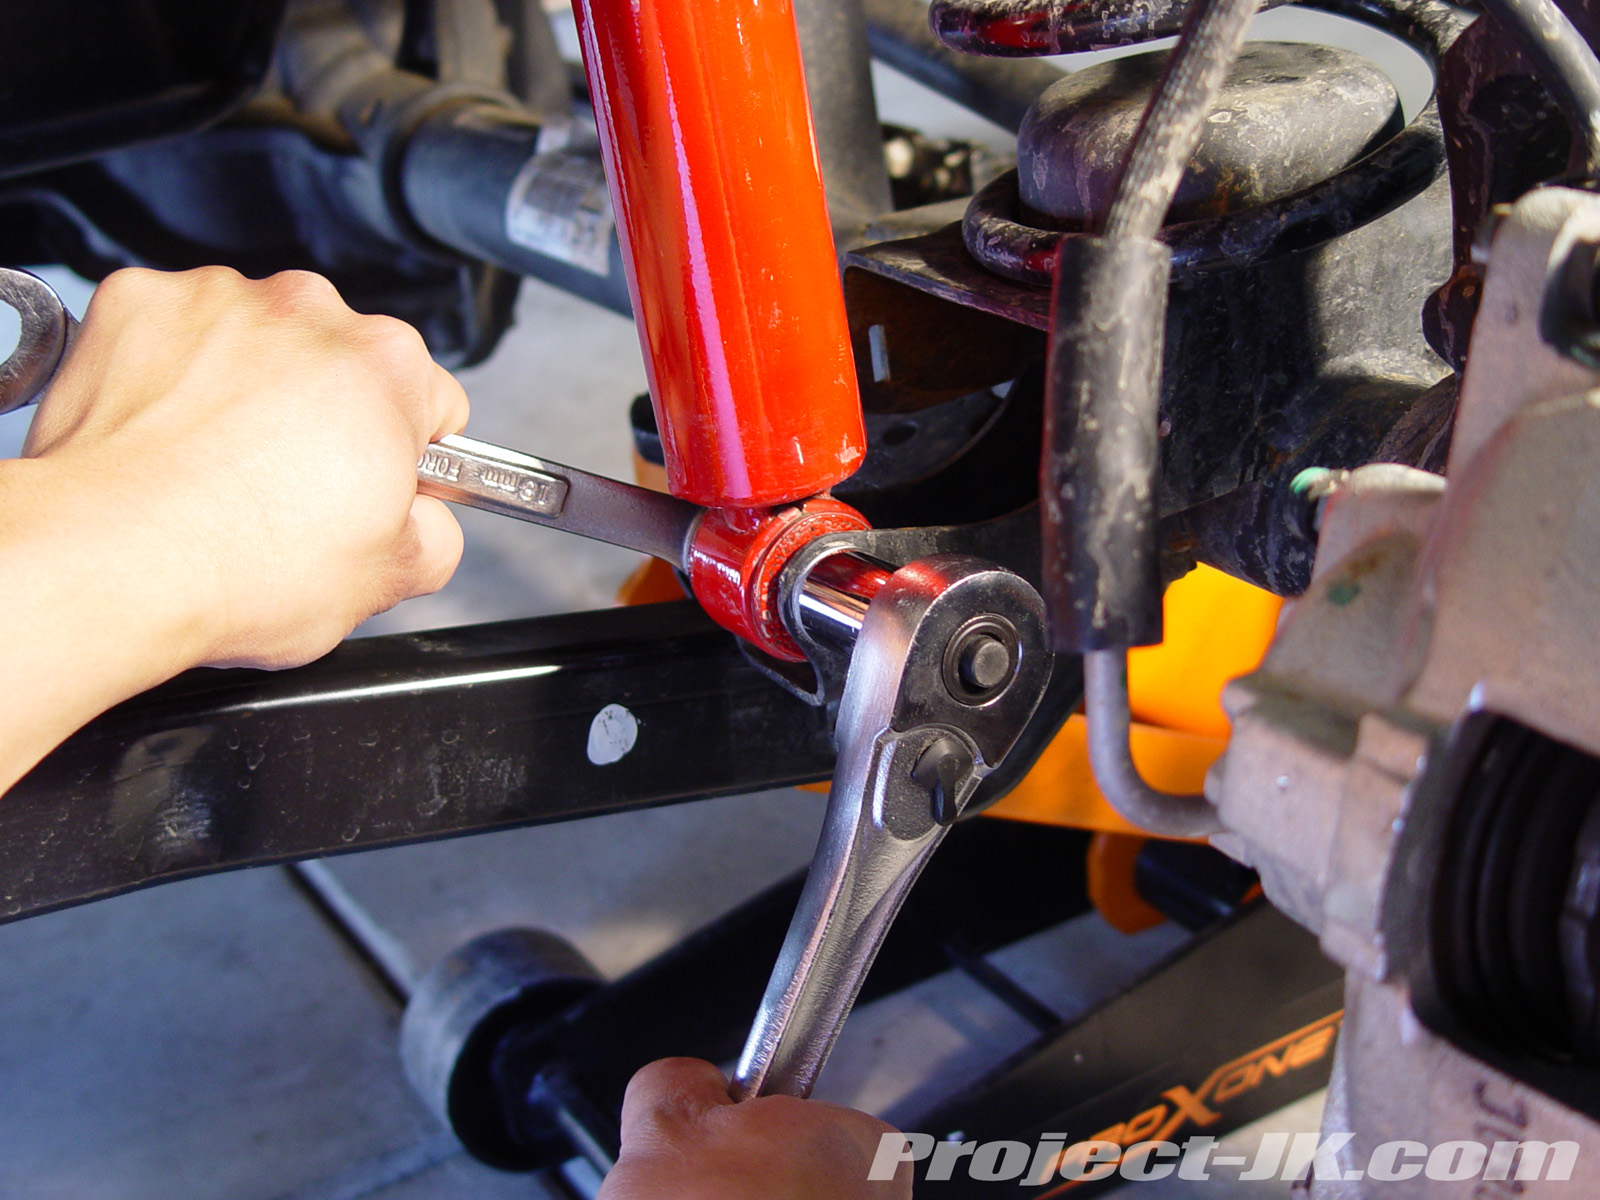
| 45. Your new Currie Rock Jock adjustable rear sway bar links should come pre-set to length but you should verify that they are in fact both the same length and make any additional adjustment you may need prior to installation. Then, use a 3/4″ wrench and socket (or 19mm wrench) to secure the links to your Jeep JK Wrangler sway bar as shown in this pic. |
46. Again, using a 3/4″ wrench and socket (or 19mm wrench), secure the Currie Rock Jock rear sway bar link to your Jeep JK Wrangler’s axle mount as shown in this pic. |
47. Using a 3/4″ wrench, tighten the 2 jam nuts (1 on either end) up against the link ends of the Currie Rock Jock rear sway bar links. |
 |
48. If you purchased your Currie Rock Jock JK Suspension System with the recommended Rancho 9000X shocks, locate the appropriate metal sleeve that will fit over the new axle mount bolt that came with the axle relocation kit and then press it into the bushing on the can side as shown in this pic. A bench vice and some white lithium grease will help to make this task easier but a hammer will do the trick as well. |
 |
49. Install your new Rancho 9000X shock up onto the frame mounts using the factory bolts. A 16mm socket and long extension will be needed for this task. Tighten these bolts to 37 ft. lbs. of torque. |
 |
50. Take the spacer that comes with your Currie Rock Jock rear shock relocation kit and slip in into your Jeep JK Wranglers axle mount. Then, position your shock bushing on the outside of the mount (next to your brakes) and secure it in place using the 1/2″-20×4″ bolt, 1/2″ washers and 1/2″-20 stover nuts. Tighten the bolt and nut to 56 ft. lbs. of torque. |
|
51. Using a 10mm socket, re-secure your Jeep JK Wrangler’s emergency brake cables hanger to the bottom of the tub using the factory nuts. |
| 52. Reinstall your Jeep JK Wrangler’s rear wheels, lower it back down on the ground and then tighten the lug nuts to 95 ft. lbs. of torque. |
  example pic example pic |
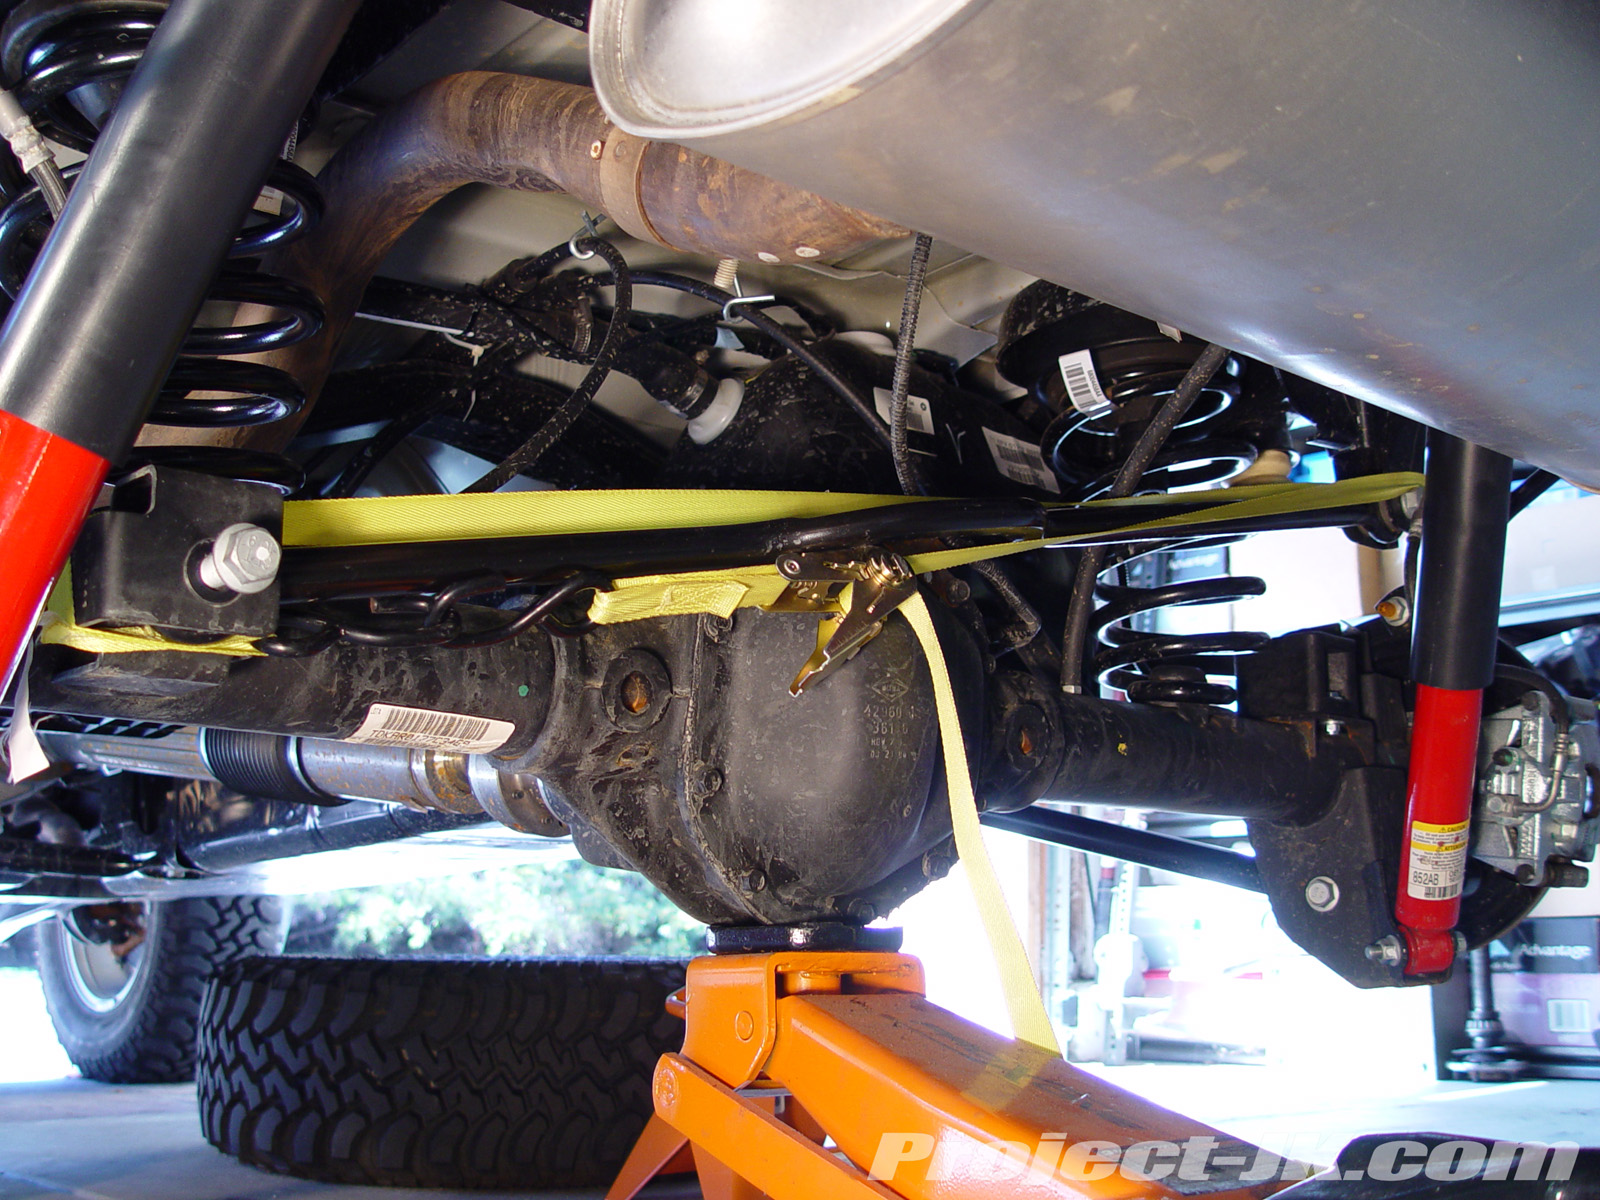
53. If you do not have the means to do your own welding and/or lack the know how, re-install your factory track bar back onto your Jeep JK Wrangler’s axle mount using the factory hardware. Now, without the track bar relocation bracket installed, your rear track bar will not line up exactly with the axle mount hole on your Jeep JK Wrangler and you will find it necessary to have a friend push on the side of your Jeep a bit in order to get things to line up. Or, if you’re doing this on your own, you can use a ratchet strap as is shown in the example pic to the left (from the TeraFlex Budget Boost Write-Up) to do the same thing. Once the 2 holes are lined up, use a 21mm socket to secure it in place with the factory hardware. Then, tighten the bolt to 125 ft. lbs. of torque. NOTE: This setup is just a temporary fix to get you to a welding shop safely and should not be used as a substitute to having the Currie Rock Jock track bar relocation brackets installed. |
 |
54. Using a 21mm socket, go around and double check that all your upper and lower control arm bolts are all tightened to 125 ft. lbs. of torque. Then, double check your track bar bolts as well. |
Front End Installation
|
 |
1. Chock your rear tires. Using an 18mm socket and wrench, remove the bolts and nuts securing your front sway bar links to the lower axle mounts. Slip a 19mm wrench in between the sway bar link and sway bar itself to secure the ball joint stud. Then, remove the nut securing it in place with an 18mm wrench. Completely remove the links from the sway bar itself. (NOTE: If you have a manual transmission, skip to step #4). |
 |
 |
 |
| 2. If you have an automatic transmission, use an 18mm socket to remove the 3 bolts (one on each frame rail and one on the cross member) securing its skid plate to the frame of your Jeep JK Wrangler. Remove the skid plate and set it aside for now. |
3. Remove the bolt securing your Jeep JK Wrangler’s front track bar to the front axle mount using a 21mm socket. This can be a tough bolt to remove and an impact wrench or breaker bar will help to make this job easier. |
4. Use a 21mm socket and wrench to remove the bolt and nut securing your Jeep JK Wrangler’s front track bar to the the frame mount. Pull your front track bar off and set it aside for now. |
 |
 |
 |
| 5. Double check to make sure your front wheels are pointing straight and turn your steering wheel until it locks at the column. Then take a 21mm wrench and loosen but do not remove the nut securing your Jeep JK Wrangler’s drag link to the pitman arm. |
6. Insert a pickle fork in between your Jeep JK Wrangler’s pitman arm and drag link and then give the end of it a couple of good whacks with a 3 lb. hammer or until the ball joint tapered stud separates from the pitman arm. |
7. Using a 34mm socket and an impact wrench or breaker bar, remove the nut and washer securing your Jeep JK Wrangler’s pitman arm to the steering box |
 |
 |
 |
| 8. Slip a pitman arm puller over your Jeep JK Wrangler’s pitman arm and then proceed to remove it by tightening the puller with a 3/4″ socket as shown in this pic. |
9. Install your new Currie Rock Jock dropped pitman arm onto your Jeep JK Wrangler’s steering box shaft and secure it in place with the factory lock washer and nut. |
10. Using a 34mm socket, tighten your Jeep JK Wrangler’s pitman arm nut to 185 ft. lbs. of torque. |
 |
 |
 |
| 11. There is a very good chance that the rubber boot on the end of your Jeep JK Wrangler’s drag link will get damaged when separating it from your pitman arm. If this is the case with yours, remove it at this time. |
12. Take your new replacement tie rod end boot, apply axle grease to the inside of it as shown in this pic. |
13. Using a 21mm socket, attach your Jeep JK Wrangler’s drag link to your new Currie Rock Jock dropped pitman arm and secure it in place with the factory nut. Tighten this nut to 77 ft. lbs. of torque. |
 |
14. Loosen (but do not remove) the lug nuts on your front wheels, raise the front end of your Jeep JK Wrangler one side at a time from the axle using a tall floor jack and then set it back down onto (2) jack stands, each placed just behind the lower control arm frame mounts as shown in this pic. |
 |
 |
 |
| 15. Remove the wheels off your Jeep JK Wrangler using a 19mm lug wrench or socket and then place them under the frame rails for added security. Leave the floor jack under the front axle to help support it. |
16. Using a 5/8″ wrench, hold your Jeep JK Wrangler’s front shock can in place just below the upper shock mount to keep it from spinning. Then, remove the stud mount nut above using a 16mm wrench. |
17. Using an 18mm socket and wrench, remove the bolt and nut securing your Jeep JK Wrangler’s front shock to the lower axle mount. Pull out the entire shock assembly and set aside the factory rubber bushings and washers as they will be reused. |
 |
18. Being mindful of your brake lines, carefully lower your Jeep JK Wrangler’s front axle until the factory front coils can be slipped out of the upper perch and be removed completely with ease. |
 |
 |
 |
| 19. Clean off the lower spring perch on your Jeep JK Wrangler’s front axle and then, using one of the Currie Rock Jock aluminum bump stop extensions as a template, mark the center hole using a center punch and hammer. |
20. Use a 1/8″ metal drilling bit to make a pilot hole in the center of your Jeep JK Wrangler’s front lower spring perches. Then, drill the pilot holes you just made to their final size using a 7/16″ metal drilling bit or Unibit. |
21. Use a 1/2″-13 tap to tap the hole you just created on the top of your Jeep JK Wrangler’s front lower spring perches. Make sure to back out often to clear out the debris and take your time. |
 |
22. Your new Currie Rock Jock front adjustable lower control arms should come pre-set to the required 22-5/8″ center to center length as specified by Currie. However, please verify this to be the case on both arms using a tape measure as shown in this pic. If it is off, loosen the jam nut and rotate the gold Johnny Joint end in or out to lengthen or shorten the control arm as needed. Once it is set, make sure to secure it in place with the jam nut. |
 |
23. Making sure to replace just one arm at a time, start on the passenger side of your Jeep JK Wrangler, remove the bolt securing the factory front lower control arm to the frame rail mount using a 21mm socket and wrench. This bolt will be tough to remove and the use of a breaker bar may be needed. Set aside your hardware for now as they will be reused. |
 |
24. Remove the bolt securing your Jeep JK Wrangler factory front lower control arm to the axle mount using a 21mm socket and wrench. As before, this bolt will be tough to remove and a breaker bar may be needed. Again, be sure to save the factory hardware as they will be reused. |
 |
25. With the gold adjustable Johnny Joint end oriented towards the frame mount and with the zerk nipples pointing up and the bend in the arm pointing inward, install your new Currie Rock Jock adjustable front lower control arm onto the frame mount using the factory hardware. Loosely tighten the bolts on for now. |
 |
26. Install your new Currie Rock Jock adjustable front lower control arm onto the axle mount using the factory hardware. Loosely tighten the bolts for now. |
| 27. Repeat steps #23-26 on the driver side and then tighten up the jam nuts as well as all the lower control arm bolts on both sides of your Jeep JK Wrangler to 125 ft. lbs. of torque. |
|
28. As was the case with your new Currie Rock Jock front adjustable lower control arms, the upper arms should come pre-set to the required 18-3/4″ center to center length as specified by Currie. However, please verify this to be the case on both arms using a tape measure as shown in this pic. If it is off, loosen the jam nut and rotate the gold Johnny Joint end in or out to lengthen or shorten the control arm as needed. Once it is set, make sure to secure it in place with the jam nut. |
 |
 |
 |
| 29. Use an 18mm wrench to separate the bolt from the flagged nut securing the passenger side upper control arm to the frame mount of your Jeep JK Wrangler. |
30. As you can see in this pic, the passenger side upper control arm frame mount bolt cannot be extracted due to your Jeep JK Wrangler’s exhaust being in the way. Currie recommends that you just cut this bolt and provides a replacement for it which will ultimately be installed in reverse. |
31. Pull the head of the passenger side upper control arm frame mount bolt out as far as you can and then cut it off using a Sawzall reciprocating saw and metal cutting blade as shown in this pic. Once cut, extract the remaining length of the bolt and remove the control arm itself from your Jeep JK Wrangler. |
 |
32. Remove the bolt securing your factory front upper control arm to your Jeep JK Wrangler’s axle mount using an 18mm socket. Be sure to save the factory hardware as they will be reused. |
 |
33. Using a power drill and a 1/2″ metal drilling bit, drill out your Jeep JK Wrangler’s upper control arm frame mount hole. This will allow you to use a replacement 1/2″x3″ grade 8 bolt. |
 |
34. With the zerk nipple on the frame side pointing down, install your new Currie Rock Jock adjustable front upper control arm onto the frame mount using the new 1/2″x3″ grade 8 bolt, washer and nut provided with the kit. Because your exhaust will still be in the way, you will need to install this bolt through your frame rail as shown in this pic. A 3/4″ socket and 6″ extension will be needed for this job. Also, pay close attention when pulling your socket back out as it can catch on your frame rail and fall inside. IF your socket falls inside, it will not be easy to extract. Loosely tighten the bolt on for now. |
 |
35. Install your new Currie Rock Jock adjustable front upper control arm onto the axle mount using the factory hardware. Loosely tighten the bolts for now. |
 |
36. Moving over to the driver side of your Jeep JK Wrangler, use a pair of needle nose pliers, pry off the wiring harness from the factory upper control arm axle mount bracket as shown in this pic. |
| 37. Repeat steps 29 and then 32-35 on the driver side of your Jeep JK Wrangler and then tighten up the jam nuts as well as the upper control arm bolts on both sides of your Jeep JK Wrangler to 75 ft. lbs. of torque. Zip-tie the wiring harness you previously cut off of the factory driver side upper control arm on to the new Currie Rock Jock arm. |
 |
38. Make sure your Jeep JK Wrangler’s coil isolator is still seated on the factory bump stop tower. Then, take one of your new Currie Rock Jock front coils, slip it up over the factory bump stop and then before seating it onto the lower spring perch, slip the aluminum spacer and polyurethane (on top of the aluminum spacer) bump stop extension through the bottom of the coil as shown in this pic. |
 |
39. Once the coil is seated, slip the 1/2″ -13×2-1/2″ bolt and washer through the center of the Currie Rock Jock bump stop extension. Then, using a 3/4″ socket and a 3″ ratchet extension, working through the coils as shown in this pic and secure to the lower axle spring perch. |
 |
 |
 |
| 40. Begin the installation of your new stainless steel brake lines by cutting the thin support tie holding your passenger side brake line and ABS line together as shown in this pic. |
41. Use a pair of pliers to carefully separate the main plastic coupling holding your brake line and ABS lines together. |
42. Using an 11mm wrench, separate your Jeep JK Wrangler’s hard line from the bracket/hose. Then, using a 10mm socket, remove the bolt securing the bracket/hose to the frame rail. Set aside the bolt for later use but the hose can be discarded. |
 |
 |
 |
| 43. Use a 10mm socket to secure your new stainless steel brake line mounting bracket to your Jeep JK Wrangler’s frame rails using the factory bolt. |
44. Place an oil catch pan underneath your Jeep JK Wrangler’s brake caliper. Then, using a 15mm socket, remove the banjo bolt securing your brake line to it and set it aside as you will need to reuse it. The hose can be discarded. |
45. Slip your new stainless steel brake line up through the new mounting bracket and then fasten your Jeep JK Wrangler’s factory hard line to it using a 12mm and 17mm wrench. |
 |
 |
 |
| 46. As before, slip one of the new copper crush washers that should come with your new stainless steel brake lines on to the factory banjo bolt you removed earlier. |
47. Insert the factory banjo bolt with copper crush washer on through the new stainless steel brake line (be mindful that the elbow of the hard line needs to extend towards the back) and then slip on another copper crush washer as shown in this pic. |
48. Using a 15mm socket, secure your new stainless steel break line to the break caliper on your Jeep JK Wrangler making sure that the hard line elbow extends out and back (as opposed to up, then out) as shown in this pic. Be VERY CAREFUL to only tighten the banjo bolt to 23 ft. lbs. of torque. This is a very delicate bolt and can break easily if too much force is applied. |
 |
 |
 |
| 49. Secure your new stainless steel brake line to the mounting bracket using the retaining clip provided with the kit. |
50. Reattach your new stainless steel brake line and ABS wiring together using the factory main plastic coupler. |
51. For additional support, zip-tie your new stainless steel brake line and ABS together as they were before. |
| 52. Check the fluid level in your master cylinder, fill as needed and then repeat steps #40-51 on the driver side of your Jeep JK Wrangler. |
 |
53. Install the Currie Rock Jock front shock relocation bracket so that the stud end goes up through your Jeep JK Wrangler’s shock tower and so that the “L” shaped sides with the mounting holes extend outward. Secure the bracket in place using the 5/8″ nyloc nut and washer. You will need a 1″ GearWrench to fasten this nut as well as a pry bar to keep the bracket from spinning. |
|
54. Again, if you purchased your Currie Rock Jock JK Suspension System with the recommended Rancho 9000X shocks, locate the appropriate metal sleeve that will fit over the factory axle mount bolts and then press it into the bushing on the can side as shown in this pic. A bench vice and some white lithium grease will help to make this task easier but a hammer will do the trick as well. |
 |
55. Using a 3/4″ wrench and a 19mm wrench, secure your Rancho 9000X shock to your Currie Rock Jock front shock relocation bracket using the new 1/2″-20×2-3/4″ bolt, 1/2″ stover nut and 1/2″ washers as shown in this pic. Tighten the bolt and nut to 56 ft. lbs. of torque. |
 |
56. Using an 18mm socket and wrench, secure your front shocks to your Jeep JK Wrangler’s axle mount using the factory hardware and tighten the nut and bolt to 56 ft. lbs. of torque. |
 |
57. In order to install your new Currie Rock Jock adjustable sway bar links on the front of your Jeep JK Wrangler, you will first need to drill out the mounting holes in your sway bar so that it measures 1/2″. While a standard cobalt metal drilling bit can do this job, it will take a lot of effort and I would recommend that you use a 1/2″ Unibit or milling bit. |
 |
58. As was the case with the rear, your new Currie Rock Jock adjustable front sway bar links should come pre-set to the proper length but you should verify this and make any adjustment required prior to their installation. Refer back to the rear sway bar links installation for instructions |
|
61. If you purchased new drive shafts, install them at this time. Otherwise, if you have an automatic and removed your skid plate earlier, use an 18mm socket to re-install and secure it to the frame of your Jeep JK Wrangler using the 3 factory bolts. It should also be noted that if you are NOT installing a new aftermarket drive shaft, you will need to notch out the forward lip of this skid plate in order to provide sufficient clearance for the shaft. |
 |
62. Reinstall your Jeep JK Wrangler’s front wheels, lower it back down on the ground and tighten the lug nuts to 95 ft. lbs. of torque. |
|
63. Attach your factory front track bar to the frame mount on your Jeep JK Wrangler and use a 21mm socket and wrench to secure it in place with the factory hardware. |
|
64. With the engine off, put your key in the ignition, make sure that the steering wheel is unlocked and then have a friend turn it in one direction or the other until you can line up your front track bar mounting hole with that of the axle mount on your Jeep JK Wrangler. Secure the track bar in place using the factory hardware and tighten them to 125 ft. lbs. of torque. NOTE: This setup is just a temporary fix to get you to a welding shop safely and should not be used as a substitute to having the Currie Rock Jock track bar relocation brackets installed. |
| 65. Using a large crescent wrench, tighten all your Currie Rock Jock adjustable lower and upper control arm jam nuts and double check to make sure you’ve tightened all the bolts to the torque specs outlined in this write-up. 66. Because you’ve installed new brake lines, you will need to bleed your Jeep JK Wrangler’s brake system. Click on the link below to see a detailed write-up on how to do this:
Jeep JK Wrangler Brake Bleeding Write-Up |
 |
67. Even with the installation of your track bar relocation bracket, there is a chance your steering wheel will be off and it is very important to have it recentered to prevent your ESP from activating unnecessarily. To do this, use a 15mm wrench to loosen the 2 nuts on the turnbuckle as shown in the pic to the left. Then, rotate the turnbuckle clockwise or counter clockwise as needed while a friend watches the steering wheel (or you periodically check on it yourself) go back to center. Once re-centered, secure the nuts and take it for a drive to check your steering wheel. This may take a few tries to get it on 100% but that’s all there is to it. |
| That should be it. Take your Jeep JK Wrangler out for a test drive and if everything checks out, take it to a welding shop to have your track bar relocation brackets installed. If you will be doing the welding yourself, see the instructions below. |
Currie Rock Jock Front Track Bar
Relocation Bracket Installation
|
 |
1. Using a hand drill with a brush or sanding attachment, remove the paint off your Jeep JK Wranglers upper control arm axle mount in preparation for the installation of your new Currie Rock Jock track bar relocation bracket. |
 |
2. Install the large Currie Rock Jock front track bar relocation bracket with the bend in it on the inside of your Jeep JK Wrangler’s factory axle mount and secure it in place by loosely fastening a 3/8″-24×1″ bolt, washer and nut to the hole on the right. Then, slip the larger of the 2 spacer provided in between the large bracket and the factory mount, place the smaller bracket on the front face of your factory mount and use a 9/16″-18×3-1/4″ bolt, washer and nut to loosely hold everything in place. |
 |
3. Loosely secure the hole on the right side of your Currie Rock Jock smaller bracket to your Jeep JK Wrangler’s axle mount using a 3/8″-24×1″ bolt, washer and nut. |
 |
4. Slip the smaller of the 2 spacers provided up in between the large Currie Rock Jock bracket and the factory mount, line it up with the left hole on the smaller bracket and loosely secure it and all the brackets in place using a 3/8″-24×3″ bolt, washer and nut. Then, go through and tighten everything up using a 1/2″ socket and wrench for the smaller nuts and bolts and a 7/8″ and 13/16″ socket and wrench for the large one. |
 |
5. If necessary, use a large C-Clamp to secure the large Currie Rock Jock bracket to your Jeep JK Wrangler’s upper control arm axle mount and then weld the two together. 6. Clean the brackets up and then apply some paint to to the bare steel. |
 |
7. Tighten the large Currie Rock Jock front track bar relocation bracket bolt and nut to 125 ft. lbs. of torque using a 7/8″ socket and 13/16″ wrench and then install your front track bar to the new bracket using the factory hardware. You will need a 21mm socket for this job and you will want to tighten the bolt to 125 ft. lbs. of torque as well. |
Currie Rock Jock Rear Track Bar
Relocation Bracket Installation
|
 |
 |
 |
| 1. If you do not have a short right angle drill, you will need to remove your Jeep JK Wrangler’s rear caliper and rotor to give yourself some extra room to work with. |
2. Use a drill or high speed rotary tool with a wire brush or sanding attachment to remove the paint on your Jeep JK Wrangler’s rear axle where your new Currie Rock Jock track bar relocation bracket will get welded on to. |
3. Install your Currie Rock Jock rear track bar relocation bracket to your Jeep JK Wrangler’s factory axle mount using the 9/16″ bolt, washer and nut as well as the 1.125″x1.6″ long spacer in between. Then, using the bracket as a template, drill a 7/16″ hole on the side of your factory axle mount. |
 |
 |
 |
| 4. Secure the side of your new Currie Rock Jock rear track bar relocation bracket to the side of your Jeep JK Wrangler’s axle mount using the 7/16″ bolt, washer and nut provided. Loosely install your track bar to insure everything lines up, make adjustments as necessary and then uninstall it before welding. |
5. Proceed to weld your Currie Rock Jock rear track bar relocation bracket on to your Jeep JK Wrangler’s axle. NOTE: DO NOT weld more than 3/4″ at a time and make sure to wait in between welds to allow for the complete cool down of the axle tube prior to continuing. |
6. Reinstall your Jeep JK Wrangler’s rear brakes. |
 |
7. Clean and paint the bare steel and then install your rear track bar onto your new Currie Rock Jock relocation bracket making sure to slip in the thick washer in between the track bar bushing and the bracket to insure a tight fit. Secure your track bar to the bracket using the factory bolt and flagged nut and tight them as well as the new large bolt and nut to 125 ft. lbs. of torque. You will need a 21mm socket for the factory hardware and a 7/8″ socket and 13/16″ wrench for the new hardware. |
Congratulations , your Jeep JK Wrangler is now sitting on top of a Currie Enterprises Rock Jock Suspension Lift. With the exception of re-centering your steering wheel, no further alignment adjustments should be needed as the only thing left would be your toe-in adjustment and this will not have changed due to the new steering design of the JK.
If everything checks out, take your rig out and get it dirty! And, if more adjustments are needed, click on the link below for information on how to do basic front end alignment: Basic do it Yourself Front End Alignment
If you have any questions, please don’t hesitate to give us a holler. |
Additional Photos
|
 |
 |
 |
|


Can I use the rec. length of front and rear, upper and lower arms as reference to use with other 4″ lift kits like the Teraflex? just from an alignment perspective?
What do you tighten the front and rear sway bar links too?
Write up looks great. This seems like a great kit.
Hi feri, this kit will effectively lift your JK about 5″ up front and 3″ in the rear so the lenghts may be a bit off for you but only by a hair. So yes, it would think you could use them for a reference point.
Hi Dennis, I apologize for leaving that info out. You will need to tighten the links to 75 ft. lbs. of torque and I have now added this to the write-up.
Eddie 🙂
About how much sag (less lift) would expect from a heavy bumper/winch?
With a heavy bumper and winch, you can expect to see as much as 3/4″ of sag.
Eddie
Not to sure about the Rec Arm Lengths?
The front Lower and Upper Arm lengths given By Currie are the same as Stock for a SWB –
i.e. Lower 22 5/8″. Upper 18 3/4″ which is what the Std ons’e are.
I set my Front Lowers to 22 3/4″ which is 1/8″ longer than stock.
I Set my Front Uppers to 18 13/16″ which is 1/16″ Longer than stock.
—————————————————
The Rears as set by Currie are-
Lower 19 5/8″. Std is 19 3/4″ so there actually 1/8″ Shorter than Stock?
Upper 17 11/16″. Std is 17 7/16″ so thats the ONLY one longer than stock by 2/8″
I set my Rear Lowers to 20 1/32″ which is 9/32″ (> 1/4″) Longer than stock.
I set my Rear Uppers to 17 25/32″ which is 11/32″ (
opps dont know what happened there Half my reply got cut off?
oh well cant be bothered typing it again, you can just guess the rest of the results i ended up with lol
hey mal, that’s what they recommended. however, for the record, i ended up changing my lenghts as well.
Hi,
I plan on installing this kit on my 09′ unlimited Rubicon, but dont want to go with the rancho or walker evans shocks. do you think there will be an issue with me installing some teraflex shocks made for a 4″ lift.
naw, should be fine. the only thing you may see is that they are shorter than what your lift can yield.
Thanks for the answer, got a couple more though. for the rear lower shock mounts. is it relocated for great supsenion travel or cuz of clearance issue between the shock and bracket. i’m only asking cuz from the angle of one of your pics of the rear track bar bracket it seems like the shock would hit if mounted in the stock mounting position. and last, i see you used new front and rear track bars and i plan to too later on, but for now i’m going to use the original ones. do you think the axles will be centered or a little off? Sorry for all the question, but thanks
honestly, i’m not sure why the rears get relocated but the front are so you can use beefier shocks like the rear. as far as track bars go, with as much lift as this kit offers, you really want to have new adjustable ones installed. without them, your axles will be off by quite a bit.
By setting the front lower control arms to 22-5/8″, doesn’t this set them to the stock length? It seems this doesn’t get your caster to 7*. I had to lengthen my arms a little bit to obtain the 7* but did that using your write-up “Basic Front-End Alignment.” This writeup was extremely helpful!
Thanks.
yes, you are correct and the length provided in this write-up came directly from currie. for my purposes, i prefer a length of 23″.