Instructions
NOTE: A winch plate or winch bumper installed on your Jeep JK Wrangler will be required in order for you to install the Mile Marker V10.Also, while this installation write-up shows the controller and wires being connected while the main body of the winch is sitting on the front of the Jeep, you may find it easier to do all this on a workbench, depending of course on what kind of front bumper you have. |
 |
This is a shot of everything you will get with your new Mile Marker V10 Winch with MiFi Technology. As you can see, it comes with a roller fairlead, cables and even a cap. |
 |
 |
 |
| 1. Using the hardware provided, install the roller fairlead onto the winch plate or winch bumper that you have installed on your Jeep JK Wrangler. You will need an 18mm and 19mm wrench for this job. |
2. Carefully lower your Mile Marker V10 winch on top of the winch plate you have installed on your Jeep JK Wrangler but do not bolt it on at this time. |
3. Cut the zip tie securing the wire rope to the Mile Marker V10 winch and feed it through the roller fairlead as shown in this pic. |
 |
 |
 |
| 4. Take the zinc plated recovery hook provided with the Mile Marker V10 winch and carefully remove the cotter pin using a pair of pliers. |
5. Pull the clevis pin out of the hook and install it onto the loop your Mile Marker V10’s winch rope as shown. |
6. Again, using a pair of pliers, carefully secure the recovery hook in place by reinstalling the cotter pin and bending it back so that it doesn’t fall out. |
 |
 |
 |
| 7. Using a 6mm allen wrench, remove the 4 bolts securing the Mile Marker V10 support beams in place. |
8. Using a 6mm allen wrench, remove the 4 bolts on the bottom of the controller. |
9. Place the controller mounting plate on the bottom of the controller and secure it in place using the bolts you removed in step #8. A 6mm allen wrench will be needed for this job. |
 |
 |
 |
| 10. Place the controller on top of the Mile Marker V10 winch making sure to line up the mounting holes. |
11. Using the bolts removed in step #7, secure the controller to the main body of the Mile Marker V10 winch. A 6mm allen wrench will be needed for this job. |
12. Slip the colored weather sleeves onto the ends of the matching wires as shown. |
 |
 |
 |
| 13. Using a 13mm wrench, remove the ground bolt on the bottom of the Mile Marker V10 winch, attach one end of the short black wire provided to the bolt and then secure it back on the bottom of the winch as shown. |
14. Using a 13mm wrench, remove the nut on the back of the controller labeled “to motor ground” and then loosely attach the opposite end of the short black wire to the mounting stud. |
15. Using a 13mm wrench remove the other nuts on the back of the controller labeled “1,2,3” and attach the short red cable to #1, the blue to #2 and the yellow to #3 as shown. Secure the wires in place with the nuts provided. |
 |
 |
 |
| 16. Using a 13mm wrench remove the 3 nuts on the back of the Mile Marker V10 motor housing and attach the short red cable to the outer most stud, the blue to the upper stud next to the spool and the yellow to the stud just below the blue as shown. Secure the wires in place with the nuts provided. |
17. Attach one end of the long black ground wire onto the stud on back of the controller labeled “to motor ground”. This end will overlap the other short wire that you installed on step #14. Use a 13mm wrench to secure the nut in place. |
18. Using a 13mm wrench, remove the nut attached to the positive stud on back of the controller, attach one end of the long red wire provided and secure it in place using the same nut. |
 |
19. Pop open the hood of your Jeep JK Wrangler, feed both the red power and black ground wires up under the grille and to the battery. Then, using a 10mm wrench, remove the nut on the battery positive terminal and secure the red winch wire to it. |
 |
20. Using a 10mm wrench, remove the nut on the battery negative terminal and secure the black ground winch wire to it. |
 |
21. Using the bolts provided, secure your Mile Marker V10 winch to your Jeep JK Wrangler’s winch plate or winch bumper. You will need a 16mm wrench for this job. |
 |
 |
 |
| 22. Lift up the rubber cap on the front of the controller and plug in the remote. |
23. Turn the orange knob on the controller to the on position and test out your Mile Marker V10 winch. |
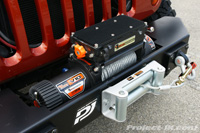
24. I didn’t like having colored wires hanging out all over the place so I spent some time and routed them down and out of the way. Here’s what the end result looks like. |
That’s all there is to it. You now have a state of the art Mile Marker V10 winch installed on your Jeep JK Wrangler. If you want to see all the photos for this write-up, simply click on the link below:
Mile Marker V10 Winch
Photo GalleryPlease let me know if you have any questions. |

Awesome write up as usual. Would it be a good thing to include some basic steel cable maintenance procedures here? How to properly pretension a steel cable and whether or not to treat it with oil, etc., for those who live in wet climates?
How long has this winch been on the market? I went to Mile Marker’s, 4WD Hardware and Quadratec’s websites to get a price (as well as other sites)on this V10 model and it was not listed anywhere.
what does it retail for?
What would you recommend for a 2 door Wrangler. The 8000 lb or the 10,000 lb winch.