Front Installation Instructions
|
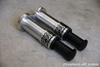 |
This is a shot of everything you will get with your new TeraFlex front Speed Bumps. |
 |
 |
 |
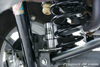
| 1. If you have an automatic transmission, use an 18mm socket to remove the 3 bolts (one on each frame rail and one on the cross member) securing its skid plate to the frame of your Jeep JK Wrangler. Remove the skid plate and set it aside for now. |
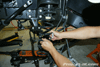
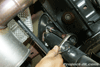
2. Remove the bolt securing your Jeep JK Wrangler’s front track bar to the front axle mount using a 21mm socket. This can be a tough bolt to remove and an impact wrench or breaker bar will help to make this job easier. |
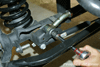
3. Park your Jeep JK Wrangler on a level surface and chock your rear tires. Then, using an 18mm socket and wrench remove the bolts and nuts securing the links to the axle mounts. |
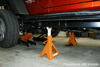 |
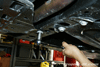
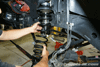
4. Loosen (but do not remove) the lug nuts on your front wheels, raise the front end of your Jeep JK Wrangler one side at a time from the axle using a tall floor jack and then set it back down onto (2) jack stands, each placed just behind the lower control arm frame mounts as shown in this pic. |
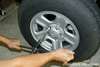 |
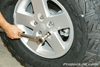
5. Remove the wheels off your Jeep JK Wrangler using a 19mm lug wrench or socket and set them out of the way for now. Leave the floor jack under the front axle to help support it. |
 |
 |
 |
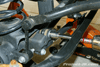
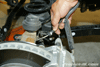
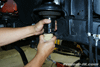
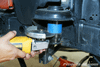
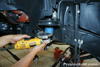
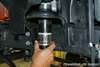
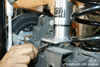
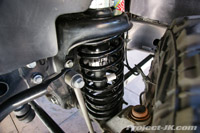
| 6. Using an 18mm socket and wrench, remove the bolt and nut securing your Jeep JK Wrangler’s front shocks to the lower axle mount. |
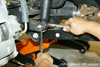
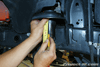
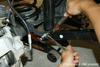
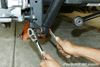
7. Pull your Jeep JK Wrangler’s ESP/BAS lines from their mounts as shown in this pic. |
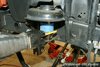
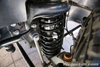
8. Being mindful of your brake lines, carefully lower your Jeep JK Wrangler’s front axle until the factory front coils can be slipped out of the upper perch and be removed completely with ease. |
 |
 |
 |
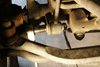
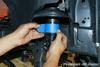
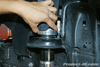
| 9. Firmly grab the yellow factory bump stop on your Jeep JK Wrangler and pry it out of its retaining cup. |
10. Grab the rubber isolator sitting at the top of the spring perch and slide it off the bump stop tower. |
11. Measuring from the bottom of your Jeep JK Wrangler’s upper spring perch, make a mark 3-1/2″ down on the bump stop tower. |
 |
12. Wrap a piece of masking tape on your Jeep JK Wrangler’s bump stop tower right at the 3-1/2″ mark you made. Try to make sure that it’s applied evenly and square to the bump stop tower as this will act as your cutting guide. |
 |
13. Using a grinder with a cutting wheel or sawzall with metal cutting blade, carefully cut off your Jeep JK Wrangler’s bump stop tower as shown.NOTE: Using a standard die-grinder with a cutting wheel, I was able to make a good, clean even cut across a majority of the bump stop tower. |
 |
14. To complete the cutting process, I had to use a sawzall with a metal cutting blade as shown. |
 |
 |
 |
| 15. Use a half-round file to de-burr and clean up the inside edge of the bump stop tower. |
16. Using a die-grinder with grinding bit, clean up the bottom lip of your Jeep JK Wrangler’s bump stop tower and make sure that follows the masking tape guide evenly across. |
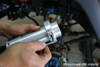
17. Using a 3/16″ allen wrench, loosen the bolt on your new TeraFlex Speed Bump retaining clamp so that it can be removed. |
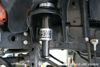 |
18. Test fit the TeraFlex Speed Bump by installing it up into your Jeep JK Wrangler’s bump stop tower as shown. Check to make sure that the bottom lip of the bump stop tower and Speed Bump meet up evenly all the way around. If it doesn’t, remove the Speed Bump and file down the uneven edges of the bump stop tower until it does. |
 |
 |
 |
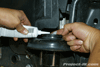
| 19. Apply some silicon sealant (NOT ADHESIVE) to the top inside lip of your Jeep JK Wrangler’s bump stop tower as shown. |
20. Apply some silicon sealant (NOT ADHESIVE) to the bottom of the TeraFlex Speed Bump just above the machined lip as shown. |
21. Install the TeraFlex Speed Bump up into your Jeep JK Wrangler’s bump stop tower. Make sure that the machined lip of the Speed Bump is making contact with the bottom of the tower. |
 |
 |
 |
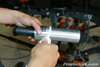
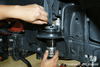
| 22. Install the retaining clamp onto the top of your new TeraFlex Speed Bump. |
23. 3/16″ allen wrench, secure the retaining clamp in place by tightening the allen bolt. |
24. Reinstall your rubber isolator back onto the bump stop tower and then reinstall your front coils. NOTE: If you have 4″ of lift or more, you need to make sure to reinstall your bump stop extensions as well. |
 |
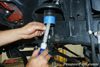
25. Using an 18mm socket and wrench, secure your front shocks back onto your Jeep JK Wrangler’s axle mount using the factory hardware and tighten the nut and bolt to 56 ft. lbs. of torque. |
 |
26. Reinstall your wheels and tighten the lug nuts to 95 ft. lbs. of torque. Then lower your Jeep JK Wrangler back on the ground. |
 |
27. Using a 21mm socket, reinstall your Jeep JK Wrangler’s front track bar and tighten the bolt to 125 ft. lbs. of torque. |
|
28. Reinstall your Jeep JK Wrangler’s sway bar links onto the axle mounts and tighten the bolts to 75 ft. lbs. of torque. |
Rear Installation Instructions
|
 |
This is a shot of everything you will get with your new TeraFlex rear Speed Bumps. |
 |
1. To make the installation of your new TeraFlex Rear Speed Bumps easier, you’ll want to remove your rear shocks. To do this, use a 16mm socket and a 6″-12″ ratchet drive extension and remove your Jeep JK Wrangler’s 2 upper rear shock mount bolts as shown. |
 |
2. Using an 18mm socket and wrench, remove the bolt and nut securing your Jeep JK Wrangler’s rear shocks to the lower axle mounts. Remove and set aside your shocks for now. |
 |
3. Place the TeraFlex Rear Speed Bump on top of your axle bump stop plate and secure it in place using the hardware provided. You will need a 13mm wrench for this job. |
|
4. Reinstall your Jeep JK Wrangler’s shock and tighten the upper mounting bolts to 37 ft. lbs. of torque and lower mounting bolts to 56 ft. lbs. of torque. |
And with that, you’re all set to hit some trails hard and fast. Please let me know if you have any questions. |
Installed Photos
|
|
 |
 |
| To see more photos of the TeraFlex Speed Bumps, click on the link below:TeraFlex Speed Bumps Photo Gallery |
This might be exactly what I need!!!! Good write up!
-is this just made for stock suspension?
-if i have a 2.5 inch suspension lift is this pointless?
-what exactly are coil overs?
sorry for the dumb questions im new to this haha
thanks,
danny
actually, i would recommend these if you have 4″ of lift.
coilovers are essentially high performance shocks and coils built as one. they are a league all their own and require significant modifications to your jeep.