Instructions
|
 |
This is a shot of everything you should get with your OR-FAB Sport Cage if you also get the rear streamer bars and floor mounts. Make sure that you verify that you have everything prior to starting this project. |
 |
1. Remove the hard or soft top from your Jeep JK Wrangler. |
 |
 |
 |
| 2. Remove the screws securing your sun visors to the windshield frame using a Torx T-15 driver. |
3. Remove the sun visor and set it aside along with its screws in a safe location as you will be reusing both. |
4. Using a phillips screwdriver, carefully remove the plastic retaining screw securing the plastic molding to the sides of the windshield frame. |
 |
 |
 |
| 5. The plastic molding is held in by plastic push tab and you will need to grab it firmly and pull down to remove it. |
6. Unzip the roll bar padding cover along the windshield support bars. |
7. The windshield support bar padding is held in with plastic push tab and you will need to grab it firmly and pull down to remove it. |
 |
8. Partially unzip the roll bar padding cover along the B-pillar to expose both the top plate and padding below. |
 |
9. The B-pillar padding is held in with plastic push tab and you will need to grab it firmly and pull down to remove it. |
 |
 |
 |
| 10. To ensure that everything goes back together properly, it is important to measure and document the distance between the B-pillar roll bar and footman loops on the windshield frame. |
 |
 |
 |
| 11. Using a 13mm socket, remove the bolts securing the B-pillar top plate. |
12. If you have a satellite radio, disconnect the antenna cable and then remove the top plate. |
13. Using a 13mm socket, remove the bolt securing the windshield support bar bracket to the side of the B-pillar. |
 |
 |
 |
| 14. Using a 13mm socket, remove the bolt securing the windshield support bar bracket to the bottom of the B-pillar roll bar. |
15. Using a 13mm socket, remove the bolt securing the windshield support bar bracket to the bottom of the windshield frame. |
16. Using a 13mm socket, remove the bolt securing the windshield support bar bracket to the side of the windshield frame. |
 |
17. Carefully remove the windshield support bars from your Jeep JK Wrangler. |
 |
18. Pop open the plastic cap of your windshield wipers and then remove the nut securing it in place using a 13mm socket. If you find it difficult to pull off the splines, use a small puller to crack it free. |
 |
 |
 |
| 19. Using a Torx T-40 Bit, remove the 6 bolts securing the windshield support plates. |
20. Remove the windshield support plate and set it aside in a safe place. |
21. Carefully lower the windshield onto the hood of your Jeep JK Wrangler. |
 |
 |
 |
| 22. Firmly grab the vent baffles, rotate it and then pull it free from the dash. |
23. Reach through the vent duct and push the side panel of your dash out and remove. |
24. Open your glove box, push the sides of it inward and remove it. |
 |
 |
 |
| 25. Using a 7mm socket, remove the 2 bolts securing the passenger side speaker box to the sub-frame of your dash. |
26. Using an 8mm socket, remove the bolt securing the bottom of the speaker box to the sub-frame of your dash. |
27. Carefully slide out the passenger side speaker box, disconnect the wiring harness and then remove it from your dash. |
 |
28. Reach in behind the dash, locate the large wiring harness secured to the side of the sub-frame and pull on it until the 2 plastic push tabs come free. You’ll want to pull this wiring harness far enough so that there will be no risk of damaging it when you cut into the sub-frame. |
 |
 |
 |
| 29. On the passenger side of your dash sub-frame, there are 2 gussets and an embossed section (highlighted in yellow) that will need to be removed. |
30. Use a Dremel with a cutting wheel to score the soft aluminum gussets. |
31. Use a pair of vice grips to break off the gussets. |
 |
 |
 |
| 32. As you can see in this pic, you just need to remove most of the material but not all of it completely. |
33. Use a drill or Dremel tool with a drill bit to make a series of holes along the edge of the embossed sub-frame. |
34. Using a small hacksaw, cut through the holes in a connect the dots fashion until the embossed section of sub-frame can be removed. |
|
35. Reconnect the wiring harness on your passenger side speaker box and reinstall it onto the dash sub-frame using the factory hardware. |
 |
 |
 |
| 36. On the driver side, you will need to remove these gussets from the dash sub-frame (highlighted in yellow). |
37. Once again, use a Dremel with cutting wheel to score the gussets and then use a pair of vice grips to break them off. |
38. This is what the driver side of your dash sub-frame should look like when done. |
 |
39. Use a 13mm socket to remove the bolts securing the door hinges to the body of your JK. Remove and set aside the hinges. |
 |
40. Use the template provided with the kit to mark the location of where you will need to drill your holes. If you will be installing floor mounts, make sure to mark the location of the lowest hole. Flip template and use on other side.NOTE: The template is shaped to fit perfectly with the embossed edge of the door seam to help give you position it accurately.
|
 |
41. Use a center punch to mark the center of where you will need to drill. |
 |
42. Begin drilling your holes with a step bit or small 1/8″ metal drilling bit to create pilot holes. Then, finish drilling out your holes with a 7/16″ metal drilling bit. |
 |
 |
 |
| 43. Take a small ruler and mark a point on the side edge of the dash about 3″ forward from the back corner as shown. |
44. Using a utility knife, slowly trim the side edge so that it’s flush with the inner surface and down to the 3″ point you marked off. |
45. As you can see in this shot, you are just trimming a little bit off to help with the fitment of the OR-FAB Sport Cage door supports. |
 |
 |
 |
| 46. Use a trim tab pry tool to carefully remove the plastic push tab securing the interior rocker molding in place. |
47. There are 2 of these push tabs that need to be removed. Make sure to do this carefully as they will need to be reused. |
48. The forward edge of the molding is held in place by an integrated push tab. Carefully pull it away from the body until it comes free. |
| NOTE: If you did not purchased the optional OR-FAB Sport Cage floor mounts, you may proceed to Step #53 |
 |
 |
 |
| 49. Use a Torx T-30 Bit to remove the 2 bolts securing your door loops to the body of your JK and then remove the loops. |
50. Slide the floor mount up in between the side of your dash and door seam as shown. |
51. The floor mounts are side specific and have a grove cut out of the floor mount that fits perfectly with this embossed ridge. |
 |
52. Using a 7/32″ allen wrench and the provided button head bolt, loosely secure the floor mount to the door seam’s lowest hole as shown. |
 |
 |
 |
| 53. Slide the straight windshield cross bar through the mounts of the streamer bars as shown. |
54. Rotate the windshield cross bar so that the end holes are facing out as shown. |
55. Carefully slide the door supports about half way or so down in between the side of the dash and the door seam. |
 |
 |
 |
| 56. Install the formed dash bar onto the lower mounts of the door supports making sure that the bends are pointing toward the hood of your JK. |
57. Place the back end of the streamer bars on top of your JK’s roll bar and then install the windshield cross bars onto the mounts of the door supports. |
58. Carefully wiggle the door supports down in between the side of the dash and door seam until the mounting holes line up. If needed, gently tap on the dash bar with a rubber dead blow hammer to get it down. |
 |
59. Using the provided button head bolts and a 7/32″ allen wrench, secure the door support to the holes on the door seam. DO NOT tighten bolts down at this time. |
 |
 |
 |
| 60. Loop a large ratchet strap around the door support bars as shown. |
61. Ratchet in the strap until you get a measurement of 49-1/4″ from center to center of the holes on top of the door support bar. |
62. Using the provided 7/16″x1″ bolts, washers and a 5/8″ wrench, secure the windshield cross bar in place. Double check your 49-1/4″ measurement. |
 |
 |
 |
| 63. Loosely install the provided 7/16″x1″ bolts and washers onto the formed dash bar. DO NOT tighten these at this time. |
64. Loosely install the new support plate on to the bottom of the B-pillar using 3 of the factory bolts that you removed earlier from the windshield support. |
65. Using 1 of the roll bar top plate bolts, loosely secure the the support plate to the side of the B-pillar as shown. |
|
 |
 |
| 66. Loosely reinstall the factory roll bar support plate on top of the B-pillar using 3 of the factory bolts and then reconnect your satellite radio antenna cable. |
67. Use the provided 7/16″x1-1/2″ bolts and washers to loosely secure the 2 forward holes of the support plates and tying them into the door bar. |
68. Using 2 of the factory bolts, loosely install the new windshield bracket onto your JK’s windshield frame as shown. |
 |
 |
 |
| 69. Fold your windshield back up to the factory position. |
70. secure the door bars onto the windshield support brackets using the provided 3/8″x1″ bolts, nuts and washers. Install 2 bolts on each side up through the bracket and just snug them up for now. |
71. Using a pair of pliers, squeeze and push out the visor clips that should still be attached to the factory windshield support bar. |
 |
72. Reinstall the visor clips into the windshield brackets as shown. |
 |
73. Using the factory screws and a Torx T-15 Driver, reinstall your sun visors. |
 |
74. Attach a medium size ratchet strap to each of the footman loops where your hard and soft tops clamp to. Attach the other end on the the holes on your B-pillar roll bar and then ratchet them in until you get a the same measurement that you recorded back on Step #10 |
 |
 |
|
| 75. Using a 13mm socket, tighten the windshield bracket bolts. Then, using a 9/16″ socket and wrench, tighten the bolts and nuts securing the door bars to the windshield bracket. |
76. Using a 13mm socket, tighten the bolts securing the B-pillar support plate to the bottom of the roll bar. |
77. Using a 5/8″ and 11/16″ wrench, tighten the bolts and nuts securing the door bars to the B-pillar support plates. |
 |
78. Using a 5/8″ wrench, tighten the bolts securing the dash bar to the door supports. |
 |
79. Reinstall the windshield support plates and secure it in place using the 6 factory bolts. You will need a Torx T-40 Bit for this. |
| NOTE: If you did not purchased the optional OR-FAB Sport Cage floor mounts, you may proceed to Step #83 |
 |
 |
 |
| 80. Using the floor mounts as a template, drill out the 2 holes with a 7/16″ metal drilling bit. |
81. Secure the floor mounts to the floor of your JK using the 7/16″x1″ bolts, washers and nuts provided. You will need to use a 5/8″ socket and 11/16″ wrench for this job. |
82. Using a 7/32″ allen wrench, tighten the bolt securing the floor mount to the door support. |
 |
83. Use a tape measure to accurately center your streamer bars on your JK. |
 |
84. If you have a 4-door Unlimited, be sure to install the rear streamer bars under the front ones before proceeding. Then, using the holes on the mounting plates as a guide, drill 2 holes into your JK’s roll bar with a 17/64″ metal drilling bit. |
 |
85. Again, using the rear streamer bar mounting plate as a guide, drill 2 holes into the rear most roll bar with a 17/64″ metal drilling bit. |
 |
 |
 |
| 86. Secure the streamer bars onto your B-pillar roll bar using the self tapping bolts provided. You will need a 1/2″ socket to do this. |
87. Using the holes in the streamer bar collars as a guide, drill out 2 holes into the windshield bar using a 17/64″ metal drilling bit. |
88. Secure the streamer bars onto the windshield bar using the self tapping bolts provided. You will need a 1/2″ socket for this job. |
 |
89. Trim the plastic interior rocker trim so that it can be made to fit around the floor mounts. Take some measurements and take your time at this. It’s a pain to do but, I used a utility knife to do this as it offers a nice clean finish. |
 |
90. The less plastic you have to trim, the better the trim will look in the end. Here’s what mine looked like when I was finished. |
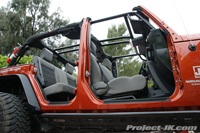
Installed Shots
|
 |
 |
 |
| To see more photos of what the OR-FAB Sport Cage looks like installed, click on the link below:OR-FAB Sport Cage Photo Gallery |
That’s all there is to it, your Jeep JK Wrangler now has a great looking roll bar that offers some nice additional support.
Please let me know if you have any questions. |

Great write up! We love our OR-Fab Sport cage…takes a while to install but love how it streghtens the existing oem cage.
I was just wondering what bracket did you use to mount your CB to your sport cage?? I can’t seem to find any that resembles yours…
it’s just a kc light bracket
Do you have any pics of the Jeep after everything is reassembled? I’m curious how the doors fit after this installation.