Instructions
|
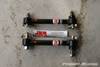 |
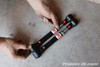
This is a pic of all the things you will get with your new JKS sway bar link quick disconnects. Take note that the passenger side link has a lower mounting post that is short and flat on one end as opposed to being tapered like the other three. Be sure you have the correct length links for the amount of lift you have and verify that you have everything before you begin this project. |
 |
 |
 |
| 1. Park your Jeep JK Wrangler on a level surface. Using an 18mm socket and wrench, remove the bolts and nuts securing your front sway bar links to the lower axle mounts. |
2. Slip a 19mm wrench in between the sway bar link and sway bar itself and hold the ball joint stud in place while removing the nut securing it in place with an 18mm wrench. At this point, you can completely remove the links from the sway bar itself. |
3. Locate the passenger side JKS sway bar link, remove the short and flat lower mounting post from the bottom of it and then remove the click pin from the post. |
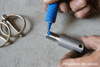 |
4. Apply some blue lock-tite to the threads of your passenger side JKS sway bar link quick disconnect lower mounting post. |
 |
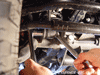
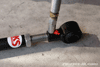
5. Install the passenger side JKS sway bar link quick disconnect lower mounting post to the inside of your Jeep JK Wrangler’s axle mount. Insert a small phillips head screw driver through the click pin hole to hold the mounting post in place and then secure it to the axle mount using one of the 1/2″ nylock nuts provided with the kit. A 3/4″ or 19mm wrench will be needed for this job. Also, be sure to try and keep the click pin hole horizontal to the ground. |
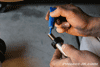 |
6. Making sure that the polyurethane offset spacer stays on it, remove the passenger side tapered upper mounting post from the JKS sway bar quick disconnect link. Remove the click pin from it and then apply some blue loc-tite to its threads as shown in this pic. |
 |
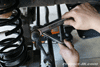
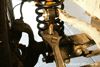
7. Install the passenger side JKS sway bar link quick disconnect tapered upper mounting post to the outside of your Jeep JK Wrangler’s sway bar. Insert a small phillips head screw driver through the click pin hole to hold the mounting post in place and then secure it to the sway bar using one of the 12mm nylock nuts provided with the kit. A 19mm wrench will be needed for this job. Also, be sure to try and keep both your Jeep’s sway bar and click pin hole horizontal to the ground as shown in this pic. |
 |
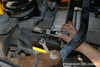
8. Repeat steps #3-7 on the driver side of your Jeep JK Wrangler. As you can see in this pic, the lower storage mounting post is longer than the passenger side and has a tapered end. |
 |
9. Set your Jeep JK Wrangler’s sway bar within +/-5° of being parallel to the ground. Install your JKS passenger side sway bar link onto the upper sway bar mounting post and then rotate the main body of the link until it’s long enough to be installed on the lower axle mounting post. Secure the jam nut up against the link body and then remove the it from your Jeep. |
 |
10. Measure the length of your JKS passenger side sway bar link eye to eye, set the driver side link to match and then secure it in place by tightening the jam nut up against the shaft of the link. |
 |
 |
 |
| 11. Using a grease gun, apply some wheel bearing grease to both ends of your JKS sway bar link quicker disconnects. |
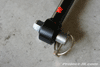
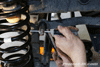
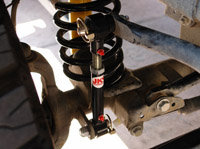
12. Install your JKS sway bar link quick disconnects on your Jeep JK Wrangler’s sway bar and axle mounts and secure them in place by inserting the click pins through the mounting posts as shown in this pic. |
13. Use a crescent wrench to tighten up the jam nuts on your JKS sway bar link quick disconnects. |
How to Use
|
| 1. When you’re ready to use your new JKS sway bar link quick disconnects, try to park on level ground as it will make the process a lot easier to do.2. Remove the click pins securing the JKS sway bar links to your Jeep JK Wrangler’s sway bar and axle mounting posts and then remove the links altogether.
3. Rotate your Jeep JK Wrangler’s sway bar up and secure it out of the way with bungee cords.
4. To reinstall the JKS sway bar links, simply reverse the process. |
That’s it, you’re done. Your Jeep JK Wrangler is now equipped with a great sway bar link quick disconnect that’s super easy to use.Please let me know if you have any questions. |
| |

This couldn’t have come at a better time. My JKS links are coming in the mail tomorrow. Thanks Eddie!
Which JKS links should I run with the Old Man Emu lift? I know it says its a 2″ lift but even you said it seemed more like a 3″. Will the the 2.5″ – 6″ JKS links workout?
yes, you should get the 2.5″-6″ kit.
Eddie
Eddie,
Do you need to extend the brake lines for the articulation with out tearing the lines out?
Josh, it depends on how much lift you have. At 2″-3″, you should be okay up front without needing to extend them.
Will I even need a jack for this job? It looks like you just have to park it on a level surface for the entire job.
Nope, you do not need a jack and yes, you will need to be on level ground to make the install easy:)
Wayoflife;
Which should be the best option and why, the JKS Quicker Disconnects – JK Series or TeraFlex Quick Disconnects 0-3�? lift ?
Thanks
honesty, both are good setups but what i do like about the teraflex discos is that it comes with storage pins and so you do not need to bungie anything up.
what does +/-5* mean and and how do i know its there?
it means slightly up or down from the actual sway bar arms (not to be confused with the links) being parallel to the ground.
mine came in today, how do I bungie when disconnected? sorry, I’m newby 🙂
no apology necessary. simply rotate your sway bar up as high as it can go and then use a bungie cord to strap it to the body mount or anywhere you can hook it on. 🙂
I installed mine yesterday! didn’t bother reading the directions that came with it, I used your write up instead 😀 much better…thanks!!!
You say to “Rotate your Jeep JK Wrangler’s sway bar up and secure it out of the way with bungee cords.”
From what I have read on the JK forums, they say to keep it parallel and tie it to the frame.
Is this what you mean?
Thanks
yes. although, i don’t think it is important to have it parallel and you can secure the link end to the body mount.
I have a 3 ” Teraflex lift and found that I rub the storage pins under extreme articulation and wheel turn. It does make some noise but has yet to damage my 35×12.5×17 BFG MR2’s. I have bent the pins on both sides just a little and have taken a hammer to straighten them a tad. I will be watching what happens on the next few trips and may disconnect the entire rod from both ends if this continues. It is already becoming a bit difficult to remove and reconnect the rods.
I have the Rough Country 4″ lift kit. Do I need to extend the front brake lines?
steel, what kind of backspacing do you have on your wheels? could be you have too much and wheel spacers will help out. or, you can install a couple of washers to your steer stops and that might help too.
federico, if i recall, your lift should have come with brake line drop brackets. if it did not, you will need them or you will want to install longer brake lines.
I have the stock 17″ aluminium rims, and yes I have the brake line brakets
if you have the brackets installed, you should be okay.
so i have a rubicon unlimited with a 2.5″ bb…i saw somewhere you recommended extended sway bar links esp with rubicons..is this b/c of the elect disco? also..i may be making this up, but i thought i saw someone somewhere advise to use to the rear sway bars links upfront, and buy more rears..is this correct??
yes, it is because of the swaybar disconnect. if your links are too short, they run the risk of over extended and flipping over. as you saw, you can take your factory rear links and install them up front but you will need new longer links for the rear.
i have a 08 rubicon jk and i removed the front auto disconnect because i installed a front bumper and it was in the way. i have a rancho lonh arm 4inch kit…can i install these? also what for the rear?
yes, you can but you will need some kind of sway bar in order to run them. as for the rear, you DO NOT want to disconnect them. the rear sway bar is much thinner and will offer plenty of flex connected and offer stability as well.
I have an 09 JK Unlimited with a 3 inch lift and just purchased some JKS disconnects for the front sway bar. Should I also buy some for the rear sway bar or stay connected in the rear?
your front sway bar is very thick and provides a lot of resistance – this is why you want to disconnect it when off roading. keeping it on will prevent you from obtaining greater articulation. your rear sway bar is very thin and can actually be manipulated by hand. needless to say, there is NO need to disconnect your rear links as i can assure you they WILL NOT prevent you from having full articulation. if anything, you want them on as they provide stability. in fact, that is the reason why companies like currie make their anti-rock sway bars – with it, you can stay connected up front as well and retain stability without sacrificing flex.
im looking into buying these as i write this but was wondering wheres the best place to order online?
nevermind, northridge4x4 was very simple! now i cant wait!!!!
Thanks for the great write-up…
Just a quick question, does it matter if the pin holes are not alligned horizontally. I put these on yesterday and could not manage to get them all horizontal to the ground.. or is it a matter of best practice?? also is there a torque specification on how much the bolts should be tightened???
nope, they do not have to be aligned horizontally. if anything, you want your sway bar arms to sit above horizontal by just a bit.
Last time I went to re-connect my quick disconnects my sway bar was very hard to move back in place after having it bungee corded out of the way. Is there a grease nipple for the sway bar ? I have a 2009 jk unlimited.
it should be hard to rotate and you do not want to grease the sway bar bushings as they are rubber.
Going to kick this under the bus too, I also have a 09 JK unlimited and have installed the JKS discos, I am at a loss on where to secure the swaybar when disconnected. Does anyone have a pic?
just take the links off and store them someplace inside your jeep. position your sway bar arm parallel to your frame and bungie cord it in place.
If i have 4in rancho lift on my 2dr jk and also have the AEV steering stabilizer kit, can i put this on my jeep?
no reason why you couldn’t
I just put these on today it was an easy installation, but if you are running the AEV highsteer kit the jks bolt for the bottom mounting posts on both sides are a tiny bit thicker than the factory sway bar link hole so some drilling was required for me to get the new jks bolts in..other than that i didnt even follow the intstructions i just used yours and everything else worked out great 🙂 thanks
My electronic sway bar disconnect on my 09 JK Rubicon has not worked for over a year and of course Chrysler won’t warranty fix it because they said it’s a wear item. Do you know how to get rid of the factory disconnect properly so I can get a quick connect installed in my Rubicon?
keep your factory disconnect and convert it to an EVO MFG no limits disconnect. it’s cheap and works way better than links like this. if you still have the light on your dash, an aev procal will allow you to turn it off.
I recently installed an AEV 3.5 Dualsport RS kit on my JKU Sahara and was looking at adding these. I contacted AEV about which length to go with. They had no suggestions. I guess they just build off of Rubicons. Since the AEV kit uses brackets that move the mounts up I am unsure as to which length to go with. I contacted Northridge and they said probably still go with the 2.5-6 but was unsure. Which would you suggest going with? Thanks
I had the same concern and went with the longer ones. When installed, the sway bar is probably +10 degrees of being parallel. Is that a concern?
Better to be too high than too low. You will be fine.
Great write up! I have two quick questions for you after installing these and using a couple of times:
1. Is it critical to have both sway bar links adjusted to the same length? The reason I ask is when I re-connect the sway bar links even on a level surface the drivers side sits a bit higher and doesn’t go back on as easy as I’d like it to.
2. Is there a reason why you couldn’t just disconnect one side and leave the other side connected? Thanks
1. no, it isn’t critical and if anything, some people purposefully set them differently to help level out their jeep.
2. depending on how long or short your links are vs. how much articulation your axle has, you may limit your travel. you will also wear the linked end out.
Great write up Eddie, as usual. On a side note about the drivers side being higher than the other. I found out after having the same problem that the issue isn’t that your on a level surface but it’s the level of fuel in your gas tank. When I initially installed my links my fuel tank was low. Since the tank sits on the drivers side rear, after filling the tank my passenger side front would be higher than my drivers side because of the added weight. When I would get ready to go wheeling and disconnect, I’d find them not even. Just bouncing the drivers corner (pushing up and down on the bumper) would flex it enough to slide them back on. As long as make sure both links are identical in length during the initial installation, your doing it right.
I have a rubicon with a 3 inch lift. I still have a pair of jks quick disconnects in the garage I hauled off my last jeep when I sold it. It is possible to use the jks quick disconnects in addition to the electronic disconnects? I heard they are compatible but have not found any reviews. I know it seems like a silly question but although the electronic system is much more convenient most of the time, sometimes it is nice to be disconnected in 2WD or at speeds just over 15mph. Plus I find the jks system gives you more articulation when you need it.