Instructions
|
 |
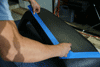
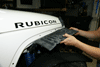
1. With your fenders still on your Jeep JK Wrangler, take some blue painters tape and spend some time masking out one side of your fenders in a shape that is appealing to you. Then, take detailed measurement so that you can replicate it on the opposite side. Using a flexible plastic ruler will help make this easier. |
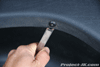 |
2. Using a trim tab removal tool and a pair of wire cutters, cut the plastic rivets securing your Jeep JK Wrangler’s front and rear fender pants to the fender itself. |
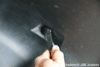 |
3. Using a trim tab removal tool, extract all the push tabs securing the front and rear fender pants to the body of your Jeep JK Wrangler. |
 |
 |
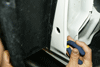 |
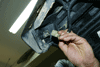
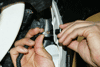
| 4. Disconnect your Jeep JK Wrangler’s side marker light wiring harness both at the lamp and at the body. You will need to press down on the release tab and pull in order to get it out. |
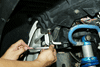
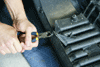
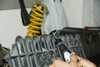
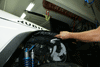
5. Using an 10mm socket, remove all the bolts securing your Jeep JK Wrangler’s front fender substructure to the body. |
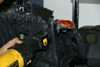
6. While most of the fender molding clips are inaccessible, there are a few that you can reach with a pair of needle nose pliers and I would recommend that you try to free them up and out if you can. |
 |
 |
 |
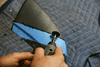
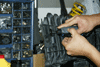
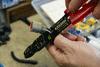
| 7. This is a close up shot of what the fender molding clips look like and how you should pinch them with your pliers in order to get them out. These clips break very easily and so the more you can save, the fewer you have to buy. |
8. As far as the rest of the fender molding clips go, your best bet is to simply pull on your fender until they all come free. I have done this a few times now and can tell you that most of the clips will come out just fine but a few may still break. Apply some touch-up paint to the body of your Jeep as needed. |
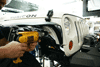
9. Using a trim tab removal tool and a pair of wire cutters, remove the remaining plastic rivets securing the front fender sub structure to it. |
 |
 |
 |
| 10. Using the measurements that you took back on step #1, mask off the rest of your Jeep JK Wrangler’s fenders so that it can be used as a guide while cutting. |
11. Using the blue painters tape as a guide, carefully cut your Jeep JK Wrangler’s fenders using a Dremel with a fiber rotary cutting wheel. |
12. The cutting process will leave some residual melted plastic clinging to your cut fenders. Use a utility or XACTO knife to shave them off and give your fenders a clean edge. |
 |
 |
 |
| 13. In an effort to give the front fenders more rigidity, I decided to reuse the factory substructure. However, left as is, the substructure is quite unsightly and so I used a Sawzall to do some trimming. |
14. Using a Dremel and fiber rotary cutting wheel, I cut off the support arm and did my best to clean things up. |
15. After doing a preliminary test fit, I found that additional cuts to the substructure would help give a cleaner factory look. |
 |
 |
 |
| 16. The door edge molding comes with an adhesive already embedded inside and so all you need to do is apply it to the edges of your newly cut Jeep JK Wrangler fenders. So you know, the warmer out it is, the easier it will be to install. A hair dryer can be used to help this process as well. |
17. If you had any of your fender molding clips break during their removal, install new ones you purchased now. |
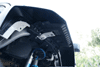
18. Reinstall your modified front fender substructure to the body of your Jeep JK Wrangler and secure it in place using the factory bolts. A 10mm socket will be needed for this job. |
 |
19. Install your brand new chopped factory fenders by snapping all the molding clips into the mounting hole along the body. |
 |
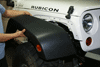
20. If you have a light colored Jeep JK Wrangler like Stone White or Silver, you may want to take some time and paint the rear fender wells black. This will help them to look factory again. |
Side Marker Light Installation
|
 |
 |
 |
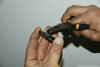
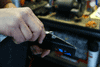
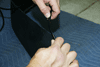
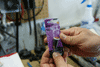
| 1. Cut your Jeep JK Wrangler’s side marker light wiring harness just past the plug that goes into the lamp. |
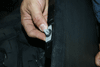
2. Strip off a bit of insulation from each wire and then crimp on a solderless blade terminal to each end as shown. |
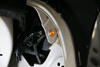
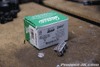
3. Using a 1/2″ drill bit or unibit, drill out the existing hole on your Jeep JK Wrangler as shown. |
  |
4. Apply a little silicon to the back end of your amber dash light, insert it into the hole you just drilled out (the shaft of the light is tapered a bit so it will be a tight fit towards the end) and then plug the solderless terminals into the blade ends of the light.5. Wrap up the solderless terminals with electrical tape.6. Turn on your parking lights to verify that your new side marker lights work. |
The Results
|
 |
 |
 |
 |
|
 |
| To see more photos of this installation and/or more shots of what your Jeep JK Wrangler can look like with chopped fenders, simply click on the link below:
Jeep JK Wrangler Factory
Fender Chop Photo Gallery |
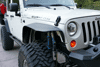
And that’s all there is to it. You now have great looking fenders that allow for tons of clearance and for dirt cheap. Please let me know if you have any questions. |
| |

Just finished my front fenders last night. I am really satisfied with how it turned out! It was actually a pretty fun project. I found that a jig saw worked perfectly for me. I’m now trying to decide if I want to try and replace the fender lining. Thanks for the writeup!
Finished both front and rear fenders Friday night. Went wheeling at Uwharrie National Forest on Saturday and all the JK owners were asking where I got them or if I could do theirs. They held up great and look even better. Thanks for the write up.
What are the measurements on the front fenders? Its a good look and I would love to cut mine like that
What did you use for an inner skirt on the front? I doesn’t look like you reused the factory skirt in any way.
Fantastic write up. Took me about 3 to 4 hours. One question however.
Does anyone have concerns about the open and exposed engine area left after removing the inner fender linings? I live in an area where we can get a lot of snow. Thoughts
x2 on the measurements. Please post them if able…
I like this mod. I know that there are a few guys out there that will tell you just to buy new fenders and that cutting them is just plain dumb. Well I personally like to do things like this because it can offer that unique look to some degree because you simply do not have to do the cut like the other guy did. I also like the fact that I can say that I did something myself beyond a swap out kit.
I would like to add my thoughts to this mod(nothing bad by any means). The use of the substructure is a great idea and when I first started looking into a cut mod I was wondering about reattaching the fender to that upper bracket. In any-case here is my idea. Why not simply drill a hole in the fender and using some form of spacer re-attach it to that bracket with one of those flat top smooth bolts(not sure what there called exactly). If done right I think that it could look decent overall if not professionally done with a little care taken. Also, I personally will not be using the door trim and will be doing a major edge cleanup and a full repainting of the finished fender.
I have to say that this site I happened to come across helped me a lot.
Thanks man.
Dan.
Do you have your measurements for the cuts? Im going chop mine this weekend and really like your look. I think I can get close just from the pictures. Thanks again for this write up.
Just did this and love the look! Thanks for the detailed writeup!
For some reason I’m getting nothing from the side marker lights. Multimeter says there’s a current, but no light. Hard to believe that both of them could be faulty. Any ideas?