Instructions
|
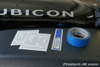 |
This is a pic of pretty much everything you will need to get your Project-JK decals applied on your Jeep. If you have scissors handy, they will make the job that much easier. |
 |
1. Before you do anything with the decals, be sure to thoroughly clean your Jeep JK Wrangler’s paint using a clean rag and water. Inspect the paint carefully and if you still feel road tar, stubborn grit or otherwise still on it, use some rubbing alcohol to get it off. |
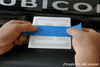 |
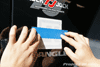
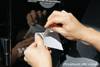
2. Making sure that your decal is reading correctly and right side up, apply a piece of blue painters masking tape across the center of the translucent setup sheet as shown in this pic. |
 |
3. Using a ruler to help keep things straight, carefully position the actual base of your Project-JK logo decal (NOT the paper backing) about 5/8" above the top of your factory ‘Wrangler’ decal as shown in this pic. Also, to ensure that your decal will be centered left to right, you can line up the side edges of your decal with the approximate position of the "A" and the "L" of the "Wrangler" as well. |
 |
4. Use the blue painters masking tape to hold your decal in place and then double check your measurements to make sure things are straight and centered. |
 |
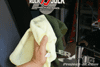
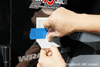
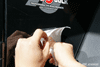
5. Carefully separate the decal from the backing sheet by pealing the upper setup sheet as shown. Make sure that the vinyl decal is still attached to the translucent setup sheet and that NO part of it is attached to the backing sheet. If any part of the decal IS still attached to the backing sheet, carefully lay the translucent setup sheet back down and burnish the decal into the setup sheet using the top of your fingernail. Repeat this process until the entire decal is attached to the translucent setup sheet. |
 |
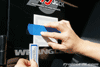
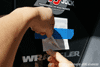
6. Holding the translucent setup sheet with decal attached to it up, cut off a strip of the backing sheet using a pair of scissors as shown in this pic. |
 |
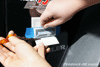
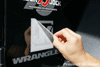
7. Holding the setup sheet away from your Jeep’s paint, use the waxie side of the backing sheet piece that you just cut off to burnish in the decal onto your Jeep. To prevent bubbles from occurring, make sure to start burnishing from the center of the decal and work your way out to the edges as shown in this pic. |
 |
8. Remove the blue painters masking tape from the setup sheet of your decal and then carefully peal the backing sheet off as shown in this pic. Once again, make sure that the vinyl decal is attached to the translucent setup sheet and that NO part of it is still attached to the backing sheet. If any part of the decal IS still attached to the backing sheet, carefully lay the translucent setup sheet back down and burnish the decal into the setup sheet using the top of your fingernail. Repeat this process until the entire decal is attached to the translucent setup sheet. |
 |
9. Again, holding the setup sheet away from your Jeep’s paint, use the waxie side of the backing sheet piece you just removed to burnish in the decal onto your Jeep. To prevent bubbles from occurring, make sure to start burnishing from the center of the decal and work your way out to the edges as shown in this pic. |
 |
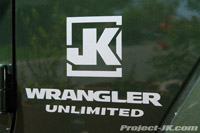
10. Carefully peal the setup sheet off your Jeep and you’re done. Now, in the event you still managed to get a few bubbles, DO NOT work at them with your finger nails or poke holes in them at this time. Simply leave your Jeep in the sun and after a few days, you should find that the bubbles will have disappeared or at least shrunk to the point of not being very noticeable. |
On a final note, your new decals will take a couple of days to cure so DO NOT wash your Jeep or wipe over them with a rag during this time. Hot sun will help to speed things along but if you if you are located in a cold region, you might want to take a blow dryer to the decals to help them out.
Please let me know if you have any questions. |
| |
Any suggestions on getting off the “X” logo for those of us with a wrangler x?
Thank you. I don’t believe I’ve ever gotten a decal on anything without bubbles, crooked, etc. I would not have thought to ask someone about a systematic method such as the one you’ve so aptly described here. I’ll probably still find a way to screw it up!
Hey Josh, the decal comes up real easy if your Jeep is sitting out in the sun. Or, if it’s cold out, a blow dryer will help out big time. Just peal slowly and if adhesive residue is left behind, rubbing at it with your thumb will get it off. Or, you can always use GooGone as well. If you use GooGone, make sure to clean your paint with some rubbing alcohol before applying your new decals.
Hey Jim, you’re welcome and I do hope this write-up helps you out.
Eddie
Have you thought of applying the decal to sheet magnet and then put it on the JK?
thanks for the helpfull tips on the decals they went on great
Hi….Very nice decals…
But i am trying to buy them for my JK Rubi here in Spain but i don´t have the option of buying it on the oreder…Do you admit other countries outside America &Canada??
Just a sugestion…here in Europe there is a high demand on Wranglers….and each country has their own language…But we all share the same language…English!!!!
So….we share all the same knowledge…
How about an European JK decal…A blue EurOpean flag with a JK logo in the center???
I think it wold be very nice…just as you all have an option of a specific decal by states in America…
Hope this suggestion works…
Thank in advance..
I posted a pic on the forum..
http://www.jk-forum.com/showthread.php?t=43087
thanks for the tips on how to install. I will be purchasing a couple of these and using them as part of a sort of custom fender set-up. They will be higher than you have them here but its gunna be sweet.
Do the windshield decals install inside or outside? I think it might provide a little help for stone chips if on the outside but worry about the wipers. Also, is it one strip of clear plastic with lettering on it or do you just have the letters once it is applied?
Thanks!
I want to add a couple of area JK stickers but want to remove the old JK stickers. Any suggestions on a good way to remove them?
I was wanting 2 of these decals but it seems I can’t order them anymore?
Any help on this?
Thanks,
John
Hi all
I just installed my JK decals. The install was as posted. Measure, cut and rub. Repeat. Looks good too.
New to a Jeep (Hell yes!! Finally!) and new to the sites. Some JK decals with the stars and stripes incorporated would be REALLY cool. Kind of like Oakley does on the side of their sunglasses. FWIW
I got my envelope from you, but it only had one decal when I ordered two of the JK Colorado decals. Could you please sent me out the second? Thanks.
100% Professional way to do Decals is, Spray bottle with Water and a drop of Dish Detergent. Before you apply the Decal, spray area and then position Decal. When it is in the desired location, take the squeegee and genlty apply pressure from center out. The soap/water method alows movement and repositioning.
Just got my WAL windshield sticker in the mail today. Fast shipping after ordering it. Will be using the above directions when I slap it on the JK tomorrow morning