Off Road Evolution Jeep JK Wrangler
EVO Front Lower Control Arm Skids


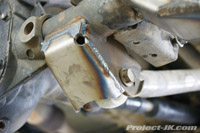
One of the most common things people hit on their Jeep JK Wrangler’s when playing on the rocks is the lower control arm axle mounts. They are after all located next to your tires and positioned low to the ground and a simple slip off of a rock can have you coming down on them and hard. For the most part, this really isn’t that big of a deal for the factory control arms as they can take quite a bit of abuse especially at the joint but like many other JK owners I know, I have found that the axle mount flanges do have a tenancy to bend and significantly from just mild impacts. And, over time and repeated abuse, these flanges can and will break. By the time I got my Jeep JK Wrangler into Off Road Evolution, the inner flange of my control arm axle mount was already showing signs of cracking. Needless to say, I decided to have these flanges reinforced with a weld but also decided to beef them up with a set of Off Road Evolution EVO Front Lower Control Arm Skids.

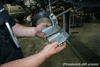
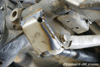
Available for only $34.99, the Off Road Evolution EVO Front Lower Control Arm Skids are constructed out of 3/16″laser cut steel, CNC bent, are designed to offer maximum protection to your Jeep JK Wranglers lower control arm mounts and made specifically to fit the passenger side and driver side axle mounts separately to insure a clean factory like finish. These skids do require some welding but any certified welder should be able to install these in under an hour and for cheap.

The following write-up details the steps necessary to install a set of Off Road Evolution EVO Front Lower Control Arm Skids.

What you will need


Off Road Evolution EVO Front
Lower Control Arm Skids

• MIG Welder
• Welding Mask
• Welding Gloves
• Drill or Die Grinder
• Wire Wheel Brush
 

 Where can I buy
Off Road Evolution products?


Off Road Evolution products can be purchased and/or installed at: 

Off Road Evolution


Installation


This is a pic of what the new Off Road Evolution front lower control arm skid plates look like. Please note that these skids are made passenger side and driver side specific.
1. Using a drill or die grinder with a wire wheel brush attachment, prepare the surface of your Jeep JK Wrangler’s lower control arms mounts by cleaning the paint off of them. 2. Using a die grinder, chamfer the forward edge of the Off Road Evolution front lower control arm skids as shown in this pic. This step is necessary to create a good weld between it and your Jeep JK Wrangler’s axle tube. 3. Hold the Off Road Evolution control arm skid up to the base of your Jeep JK Wrangler’s lower control arm mount to verify that you have the correct one for the side that you will be starting on.
10. Tack weld the Off Road Evolution control arm skid plate onto your Jeep JK Wrangler’s lower control arm mount. 11. Double check to make sure that the Off Road Evolution control arm skid is positioned correctly and situated in a way to allow for good welds to be made. 12. Stitch weld the sides of your new Off Road Evolution control arm skids onto your Jeep JK Wrangler’s lower control arm mounts.
13. As a preventative measure, you might want to have the inside lower control arm mount flange reinforced with a weld where it connects to the axle tube of your Jeep JK Wrangler. On my Jeep, I was already seeing signs of a crack and it was just a matter of time before it broke.

That’s all there is to it!! Your Jeep JK Wrangler’s front lower control arm axle mounts have just been beefed up and reinforced with a set of Off Road Evolution EVO Front Lower Control Arm Skids. Please let me know if you have any questions.

Installed Photos


To see more photos of what the Off Road Evolution C2 front axle C gussets look like installed, click on the link below:Off Road Evolution EVO Front
Lower Control Arm Skid Photos


1 Comment

  1. Im just about to have this Job done (along with the Gussets).The only thing i would Add is when mine are being welded im going to just Crack off the lower control arm bolts, i think if there left Torqued it will be very tight getting the control arm out (or back in) if there’s no side clearance.

    Cheers

Leave a Reply

Your email address will not be published.


*